AMS USER MANUAL
All about AMS Technical use

KPrimeSoft Support
Last Update 3 anni fa
INTRODUCTION
The AMS module encompasses a range of specific functionalities, each geared towards distinct objectives. These include: Dashboard, Sell Transactions, Invoices, Banking Transactions, Bank Accounts, Cash Transactions, Cash Accounts, Expense Requests, Expense Decisions, Expenses, Fund Allocations and Financial Statements.
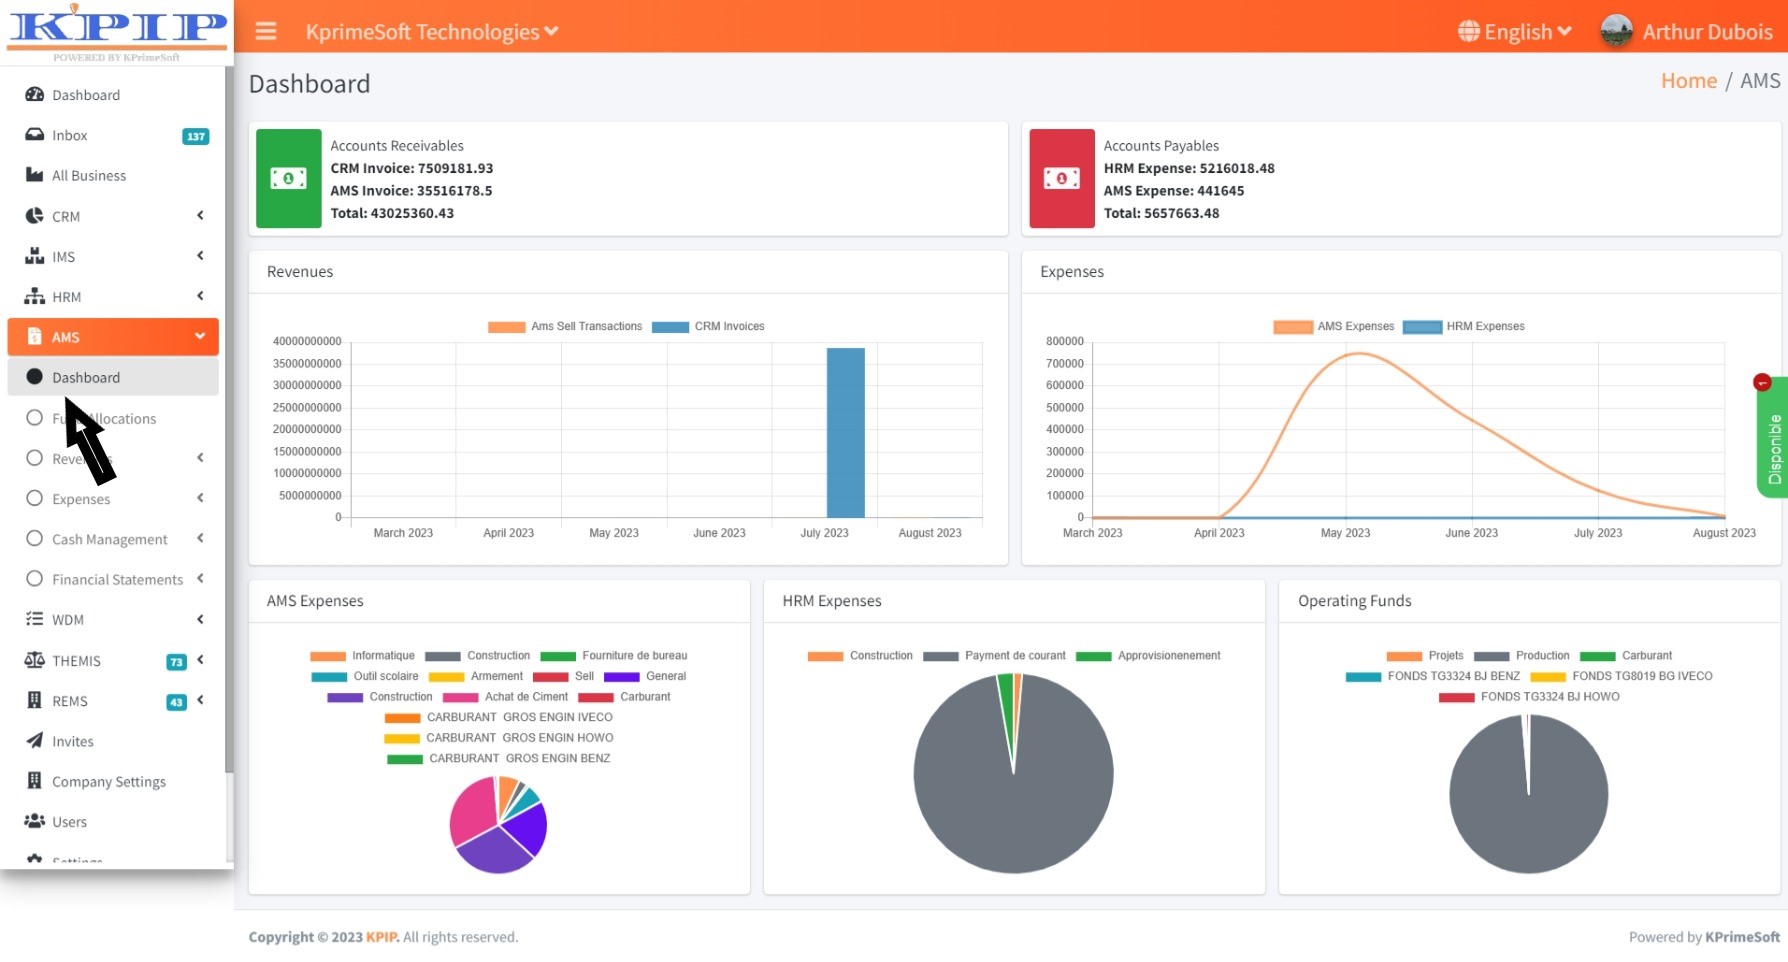
I - DASHBOARD
This space provides diagrams that display a comprehensive overview of the company's expenses, income, operating funds, and other accounting and financial activities.
II - FUND ALLOCATION
This feature enables you to capture fund allocations.
Upon selecting the "Fund Allocation" feature, a table will be displayed on a new page, showcasing all previously made and saved fund allocations. Within the “Action” section, you have the ability to review the specifics of a fund allocation, make edits, or remove it as needed.
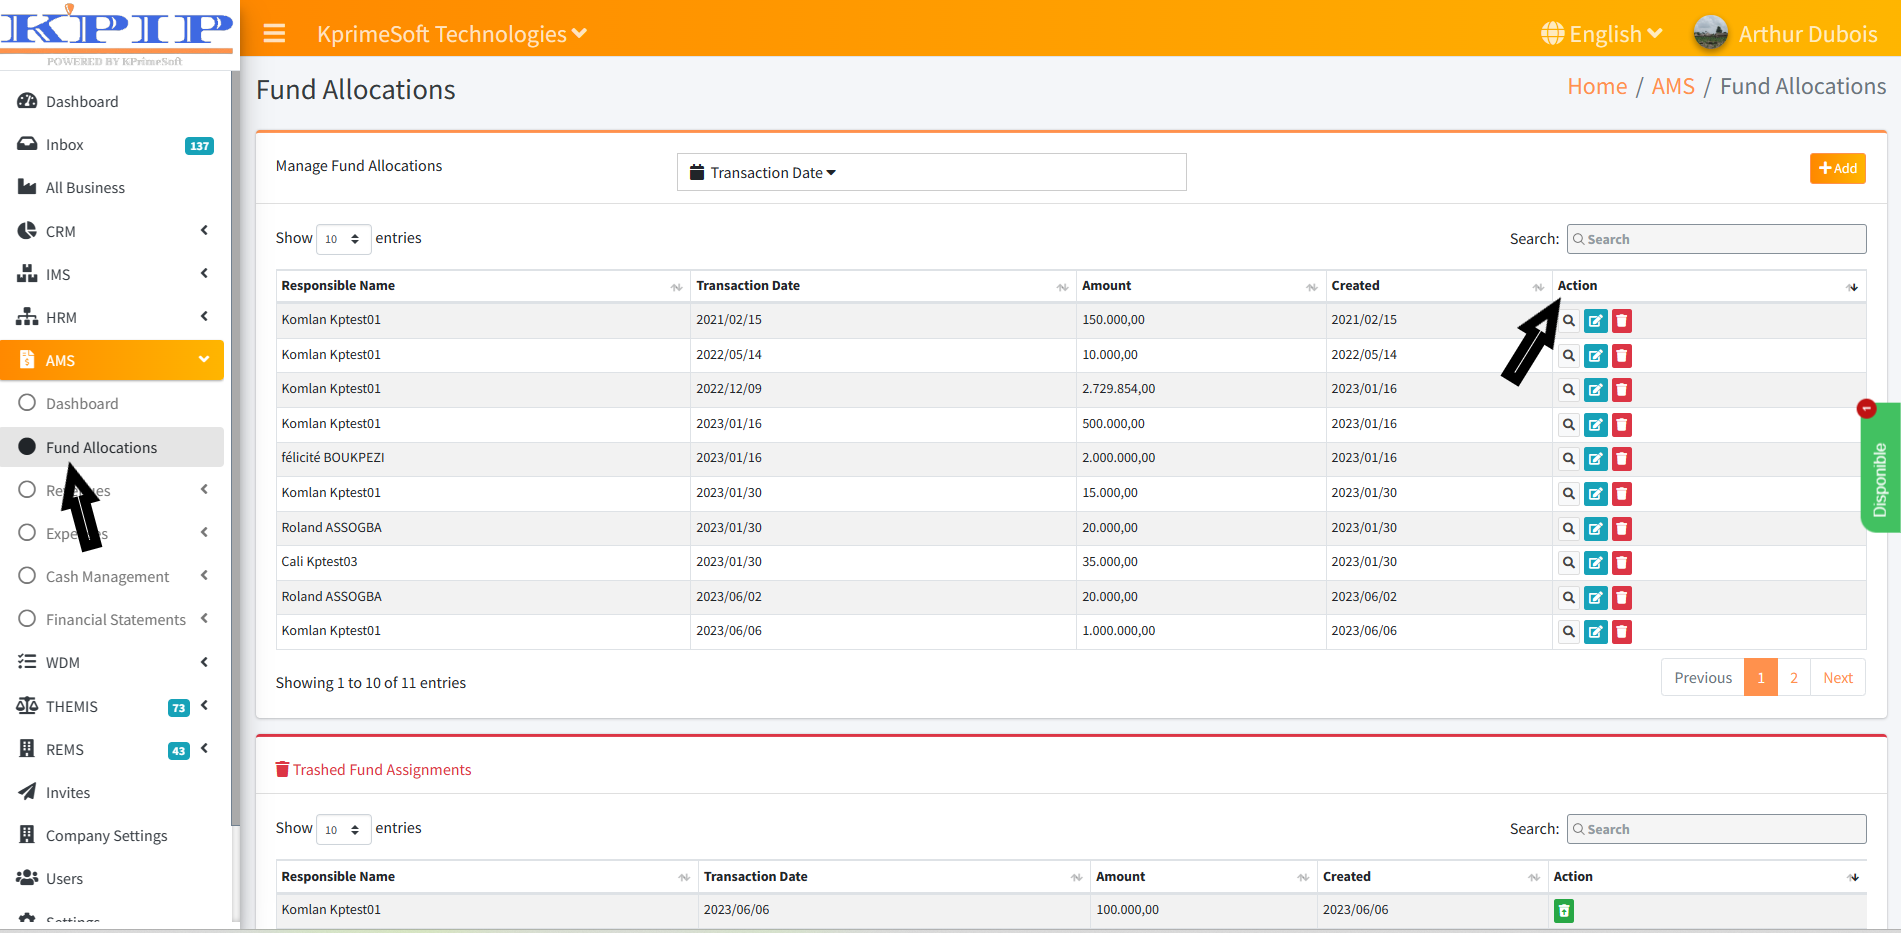
The "Show Entries" option enables you to specify the desired number of fund allocations you wish to display per page.
The "Transaction Date" option permits you to swiftly search for fund allocations recorded within a specified time range.
The "Search" option enables you to quickly find fund allocations assigned to an employee by entering the employee's name.
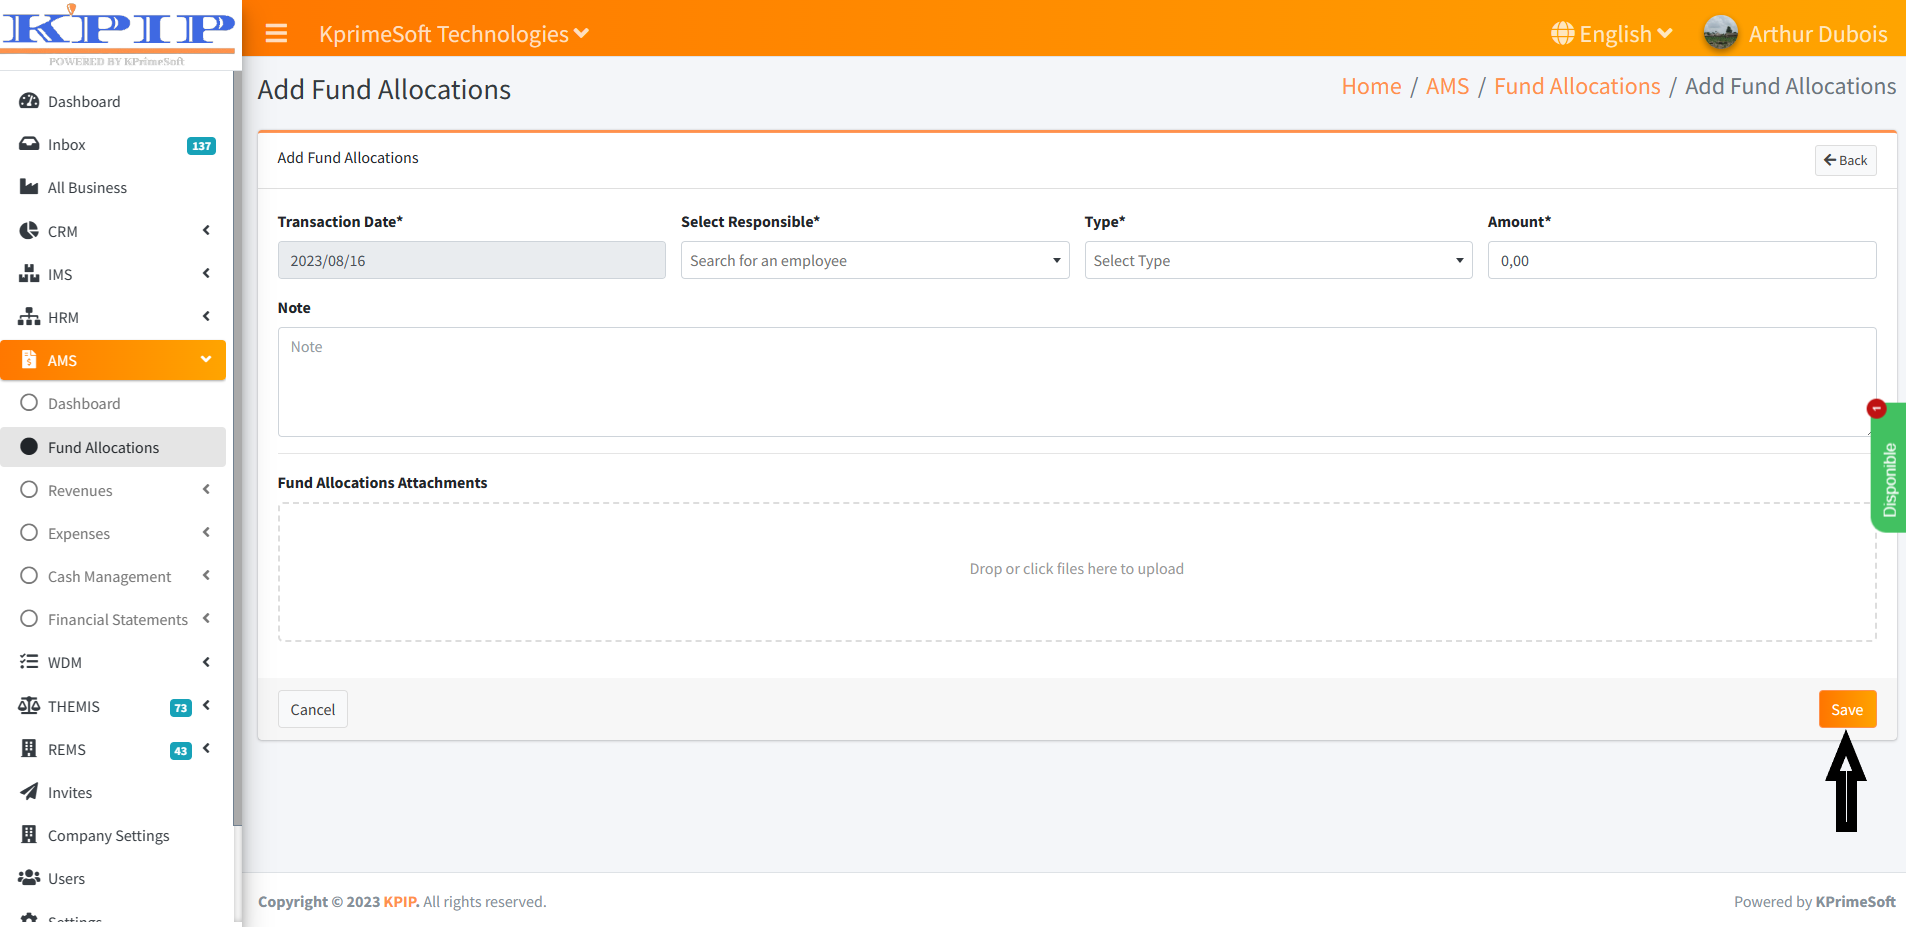
For adding a new fund allocation, click on the “Add” button. On the subsequent page, complete the form, and then press the “Save” button to save your changes.
III - REVENUES
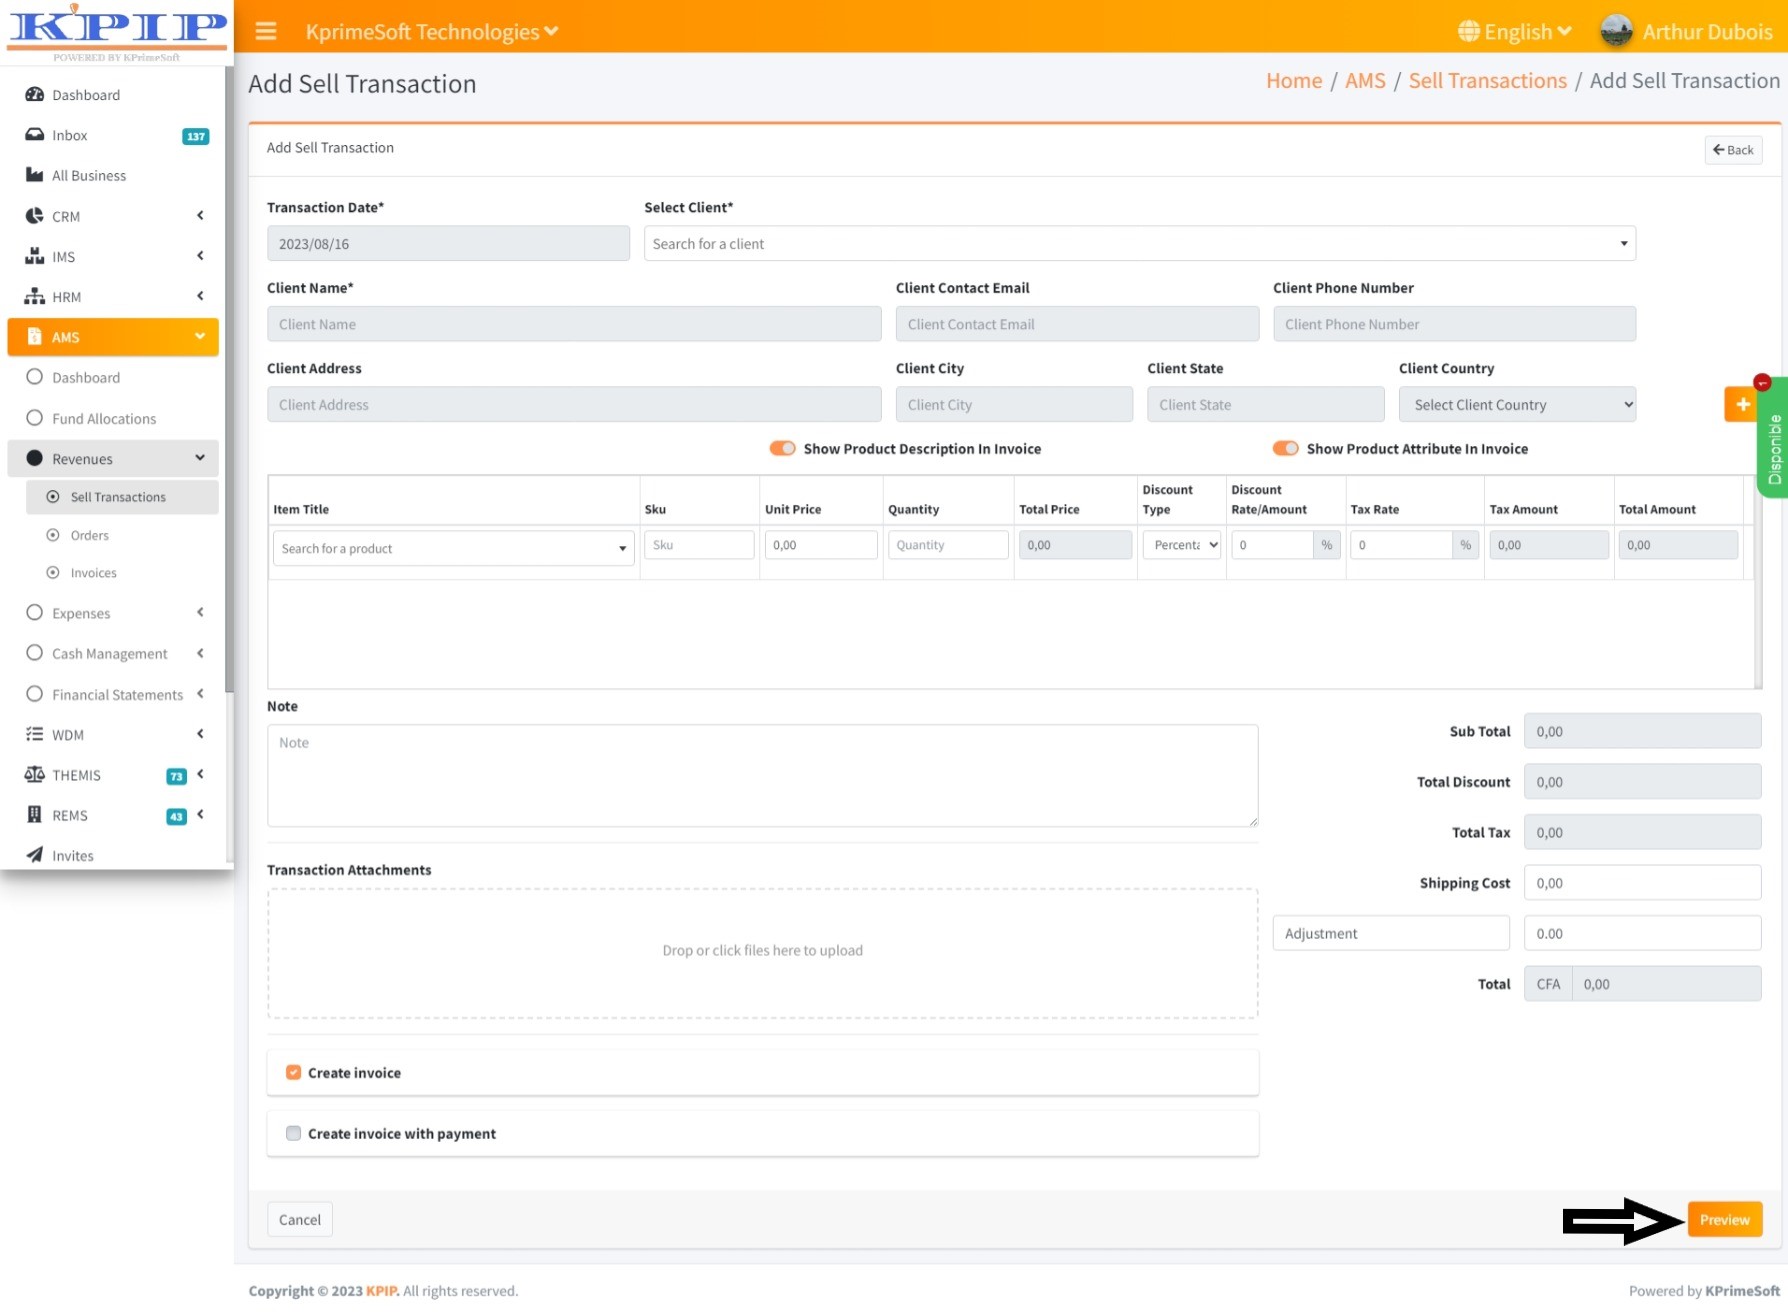
1. SELL TRANSACTIONS
This feature enables you to log sales conducted by the company.
Upon selecting the "Sell Transactions" option, a table will be displayed on a new page, listing all the sales that have been previously recorded. Within the "Action" section, you have the option to view the specifics of a particular sale.
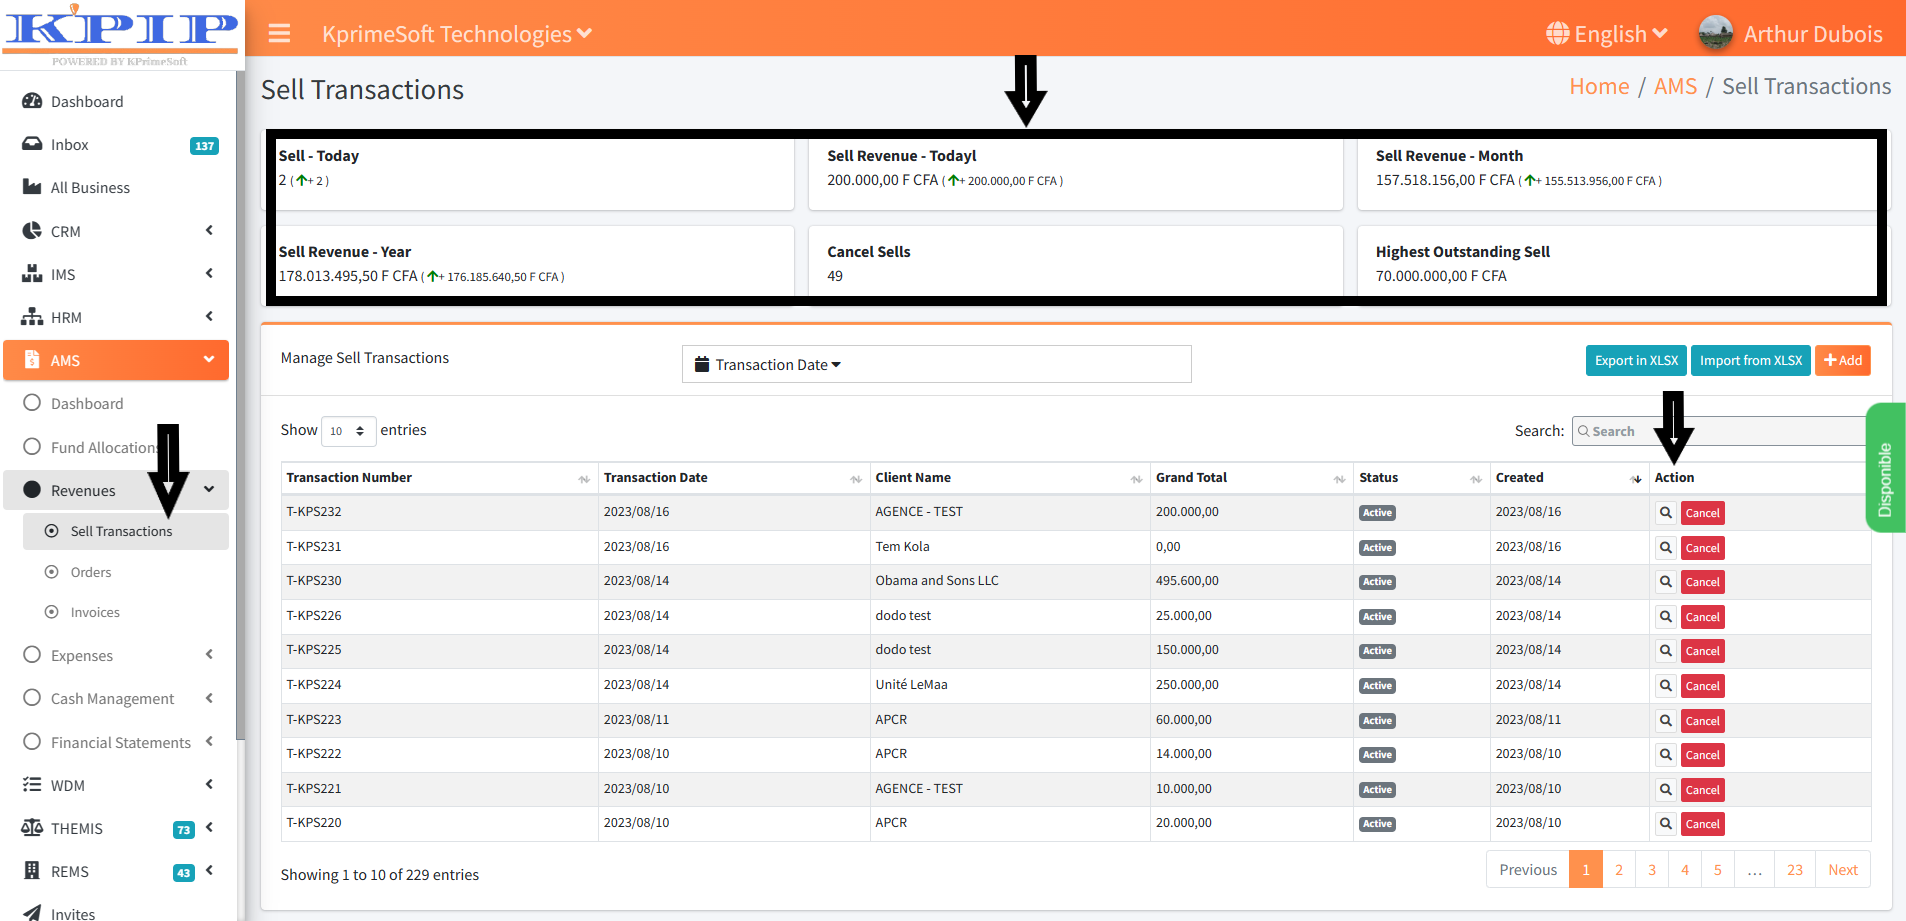
The "Show Entries" option enables you to specify the quantity of sales you wish to display per page.
The "Transaction date" option enables you to swiftly search for sales recorded within a designated time range.
The "Export to EXCEL" feature allows you to transfer your sales data from the AMS module to an EXCEL file on your computer.
The "Import from XLSX" functionality permits you to bring in your sales data from an Excel file on your computer into the AMS module.
The "Search" feature enables you to look for a specific sale within the AMS system by entering your desired text. To initiate this, click inside the search box and commence typing the text. You will be presented with a list of options from which you can make a selection. All results connected to the entered text will then be displayed.
To add a new sale, click the "Add" button. On the subsequent page, complete the form, and then finalize the process by clicking the "Save" button.
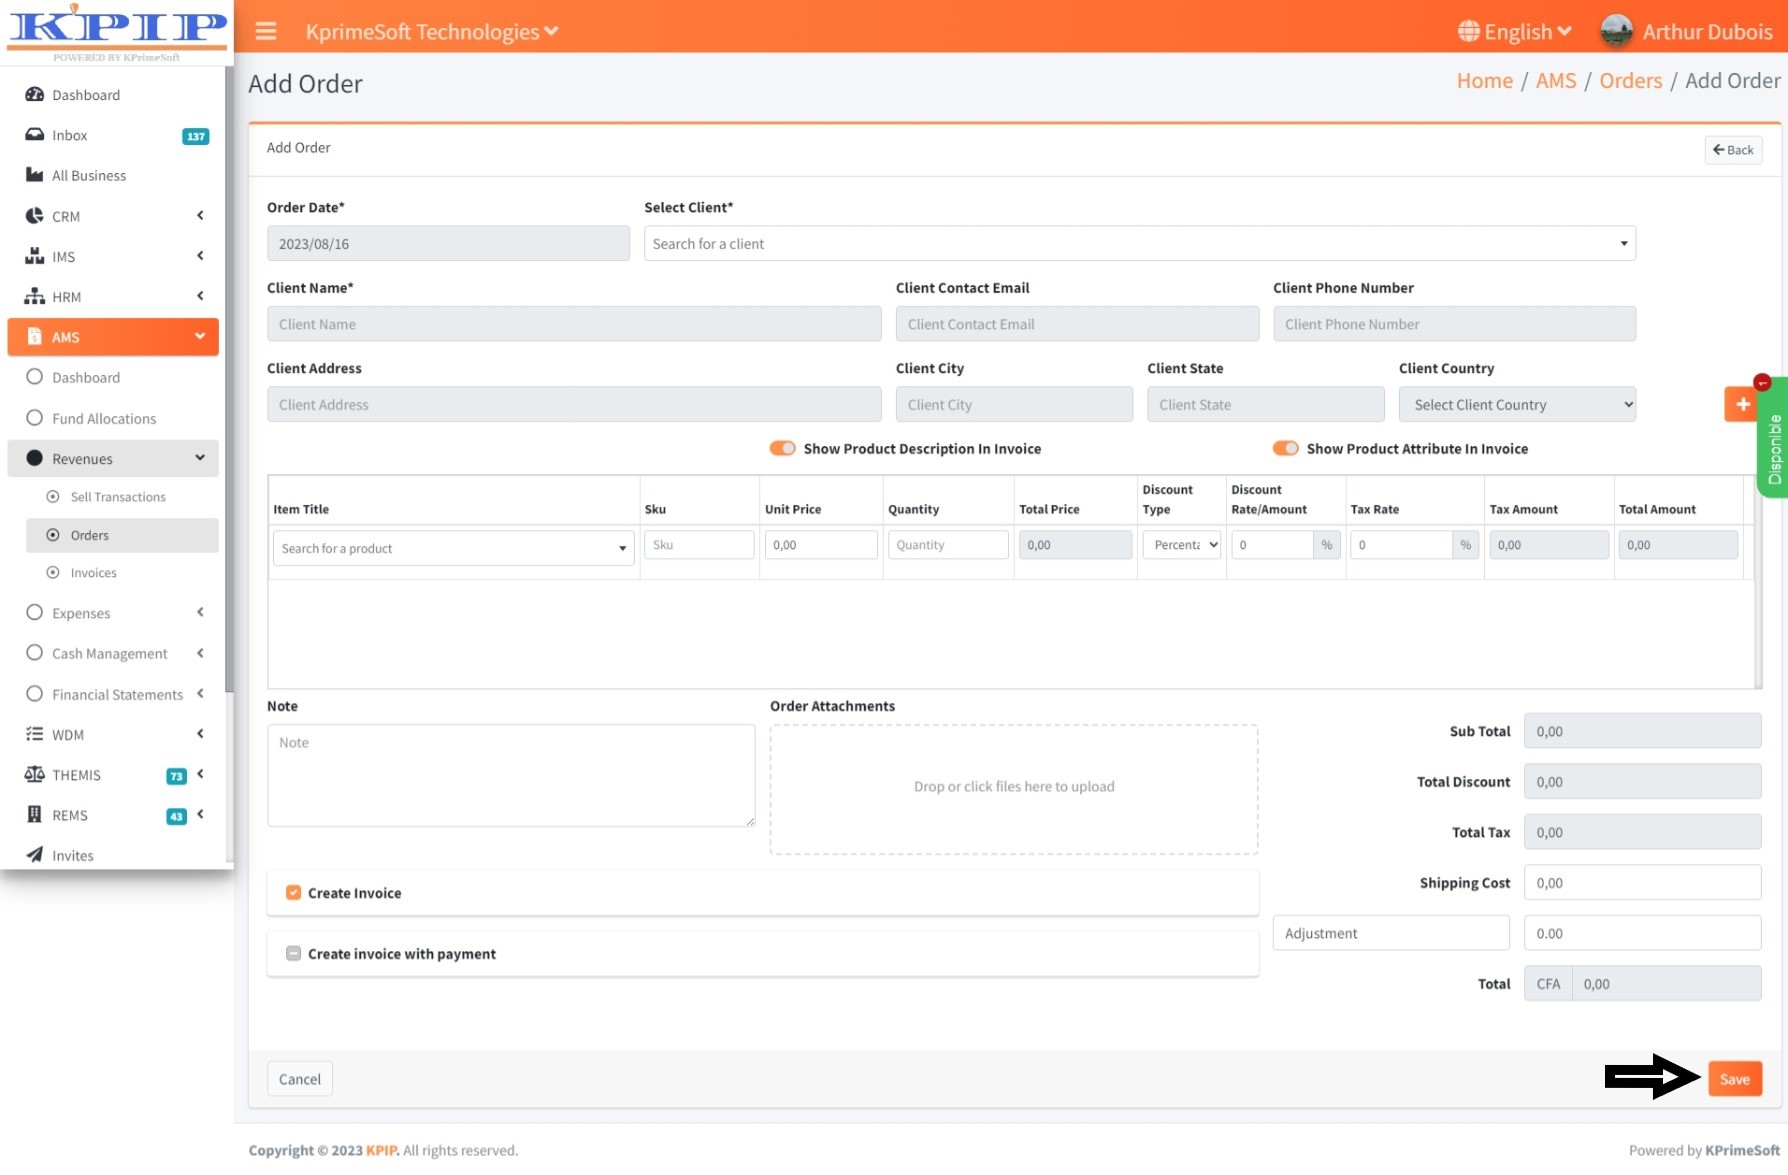
2. ORDERS
This function enables the generation of customer orders.
Upon selecting the "Orders" function, a table will be displayed on a new page. This table will encompass all the orders that have been previously recorded. Additionally, automatic statistics and filtering options will be situated above the data table. Within the "Action" segment, you will have the capability to access various functionalities. These include viewing the specifics of an order, creating a duplicate of it, or initiating its cancellation.
In the "View details" action, you will be able to perform actions such as appending a payment, generating a printout of the order, or converting the order into a PDF file.

The "Show entries" option allows you to specify the number of orders you would like to be displayed per page. The "Search" option enables you to swiftly locate saved orders by entering the customer's name.
To insert an invoice, click the "Add" button. Upon reaching the subsequent page, complete the form and press the "Save" button to store the information.
3. INVOICES
This feature is employed to create invoices for customers.
Upon selecting the "Invoices" option, a table will appear on a new page, displaying all the previously recorded invoices. In the "Action" section, you have the option to view the details of an invoice by generating a PDF file, printing it, producing and printing the invoice receipt, integrating payments, and sending the invoice via email.
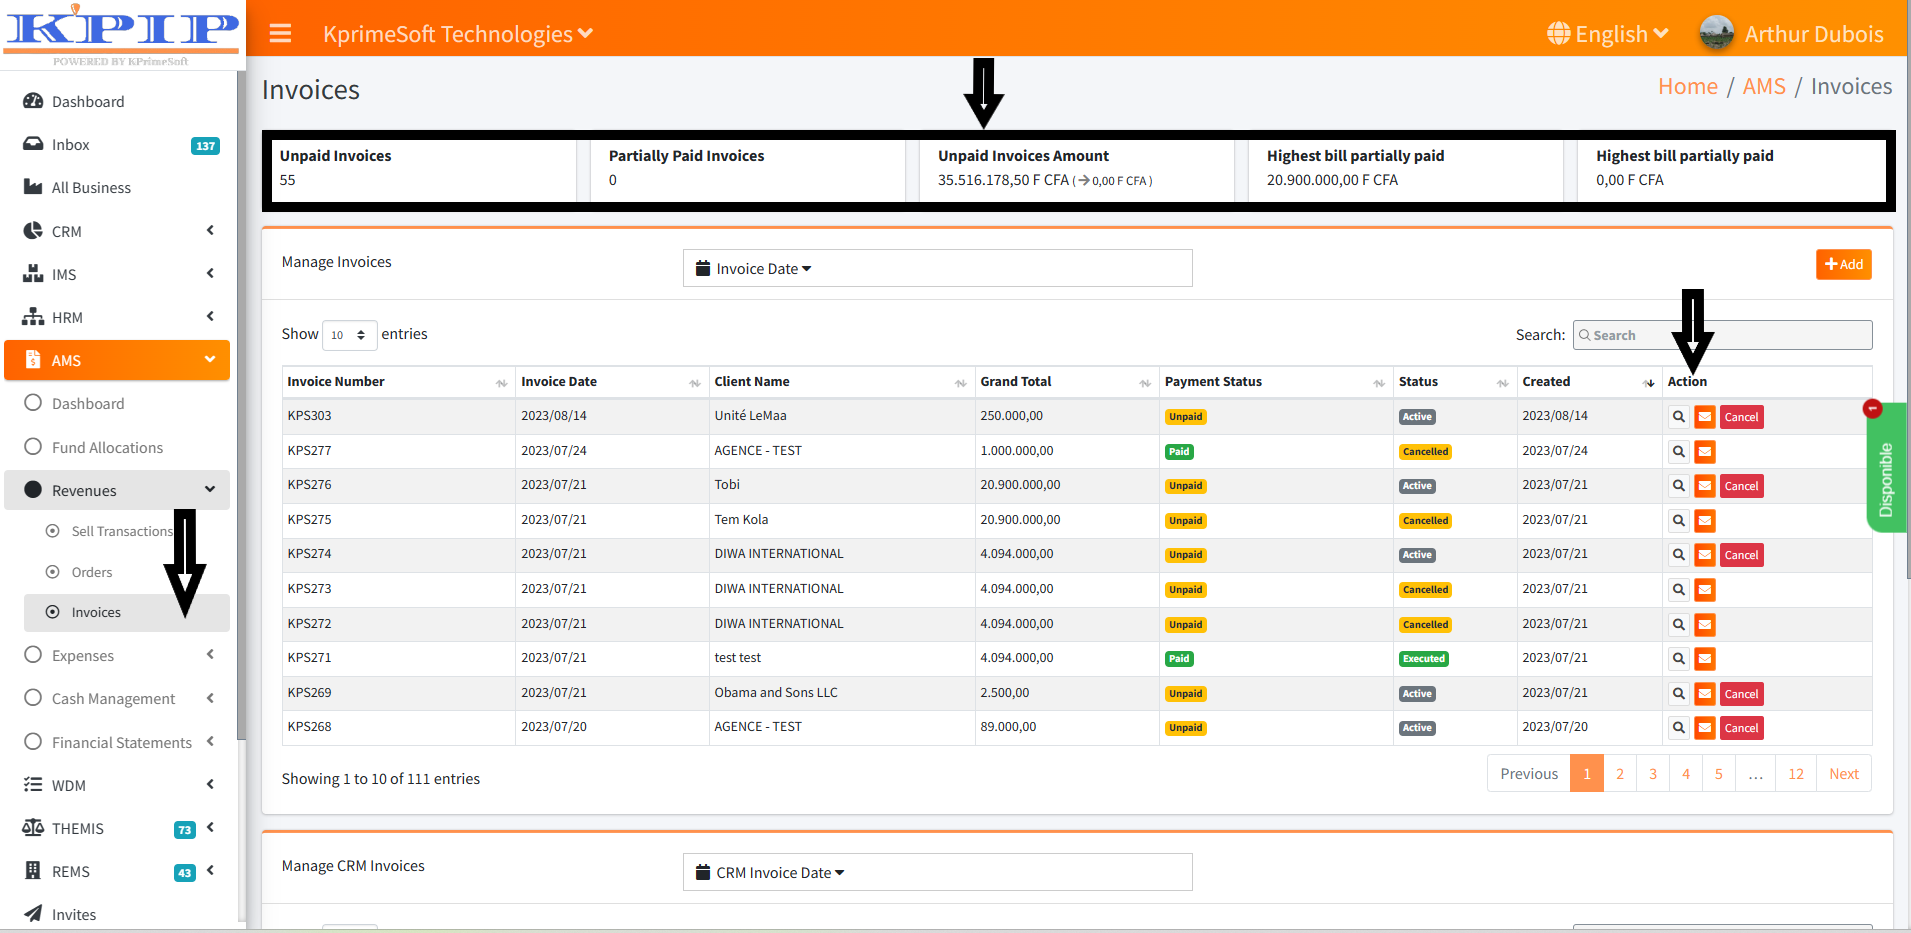
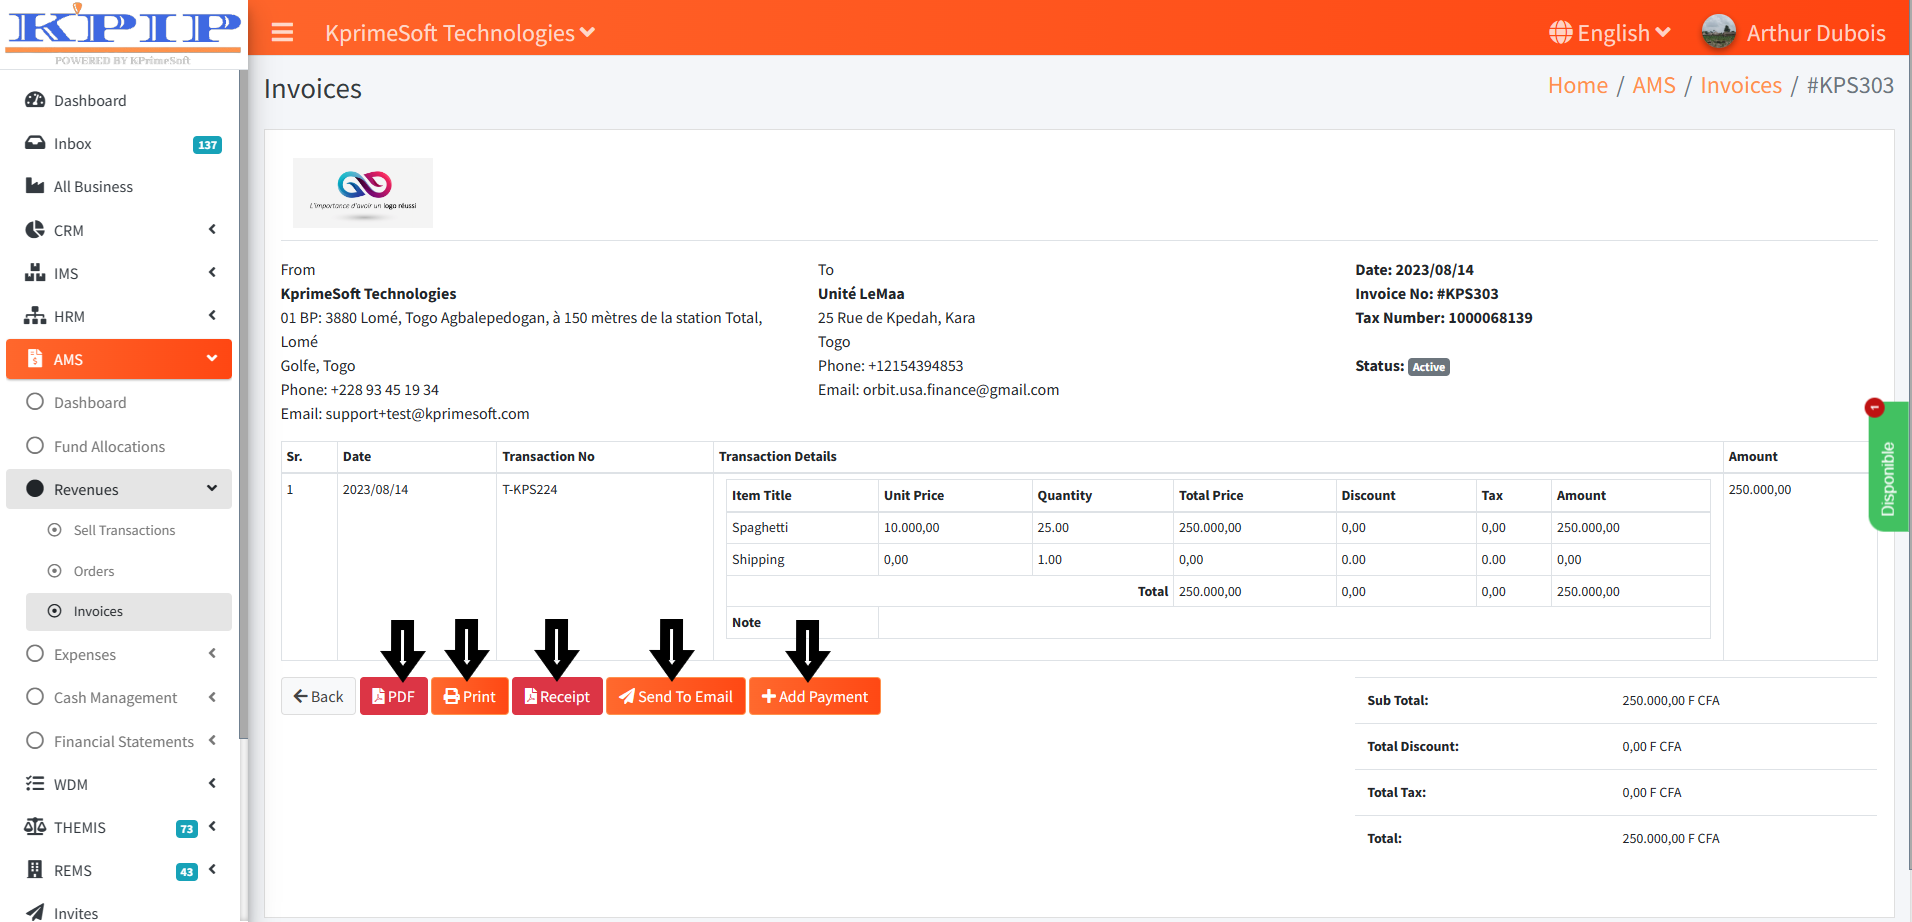
The "Show entries" option enables you to specify the quantity of invoices you prefer to be displayed per page.
The "Search" feature permits you to look for an invoice within AMS by inputting the relevant text. To initiate this, click inside the designated box and begin typing the text. Subsequently, a list of options will be presented from which you can make a selection. All results associated with the entered text will be displayed.
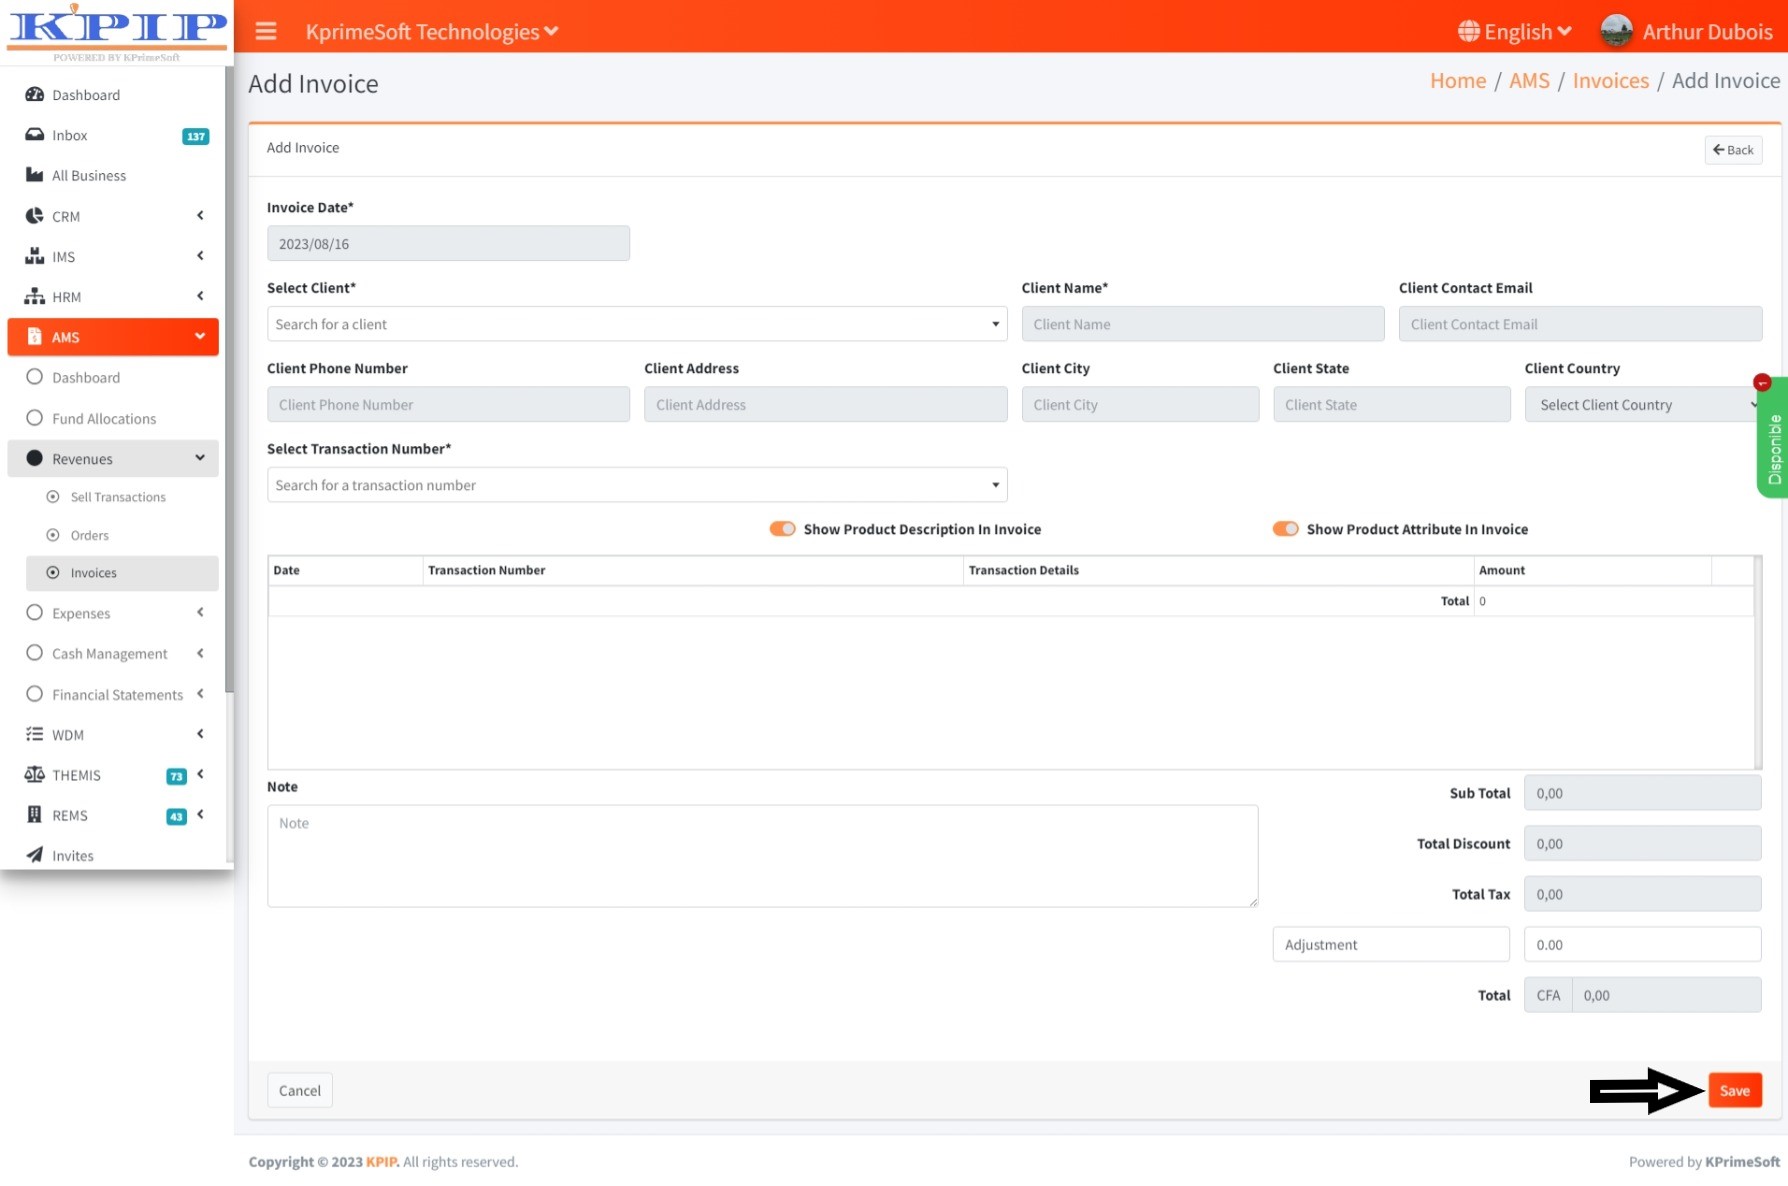
For the addition of an invoice, locate and click the "Add" button. This action will direct you to a new page where you should complete the provided form. Upon completion, finalize the process by clicking the "Save" button.
IV - EXPENSES
1. EXPENSES REQUESTS
This feature enables you to submit expense requests within your business.
Upon clicking the "Expense Requests" feature, a table will emerge on a new page, displaying all the submitted expense requests. Within the "Decision" section, you can ascertain whether an expense request is awaiting a decision, or if it has already been approved or rejected by the manager. In the "Action" segment, you have the option to review the particulars of an expense request.
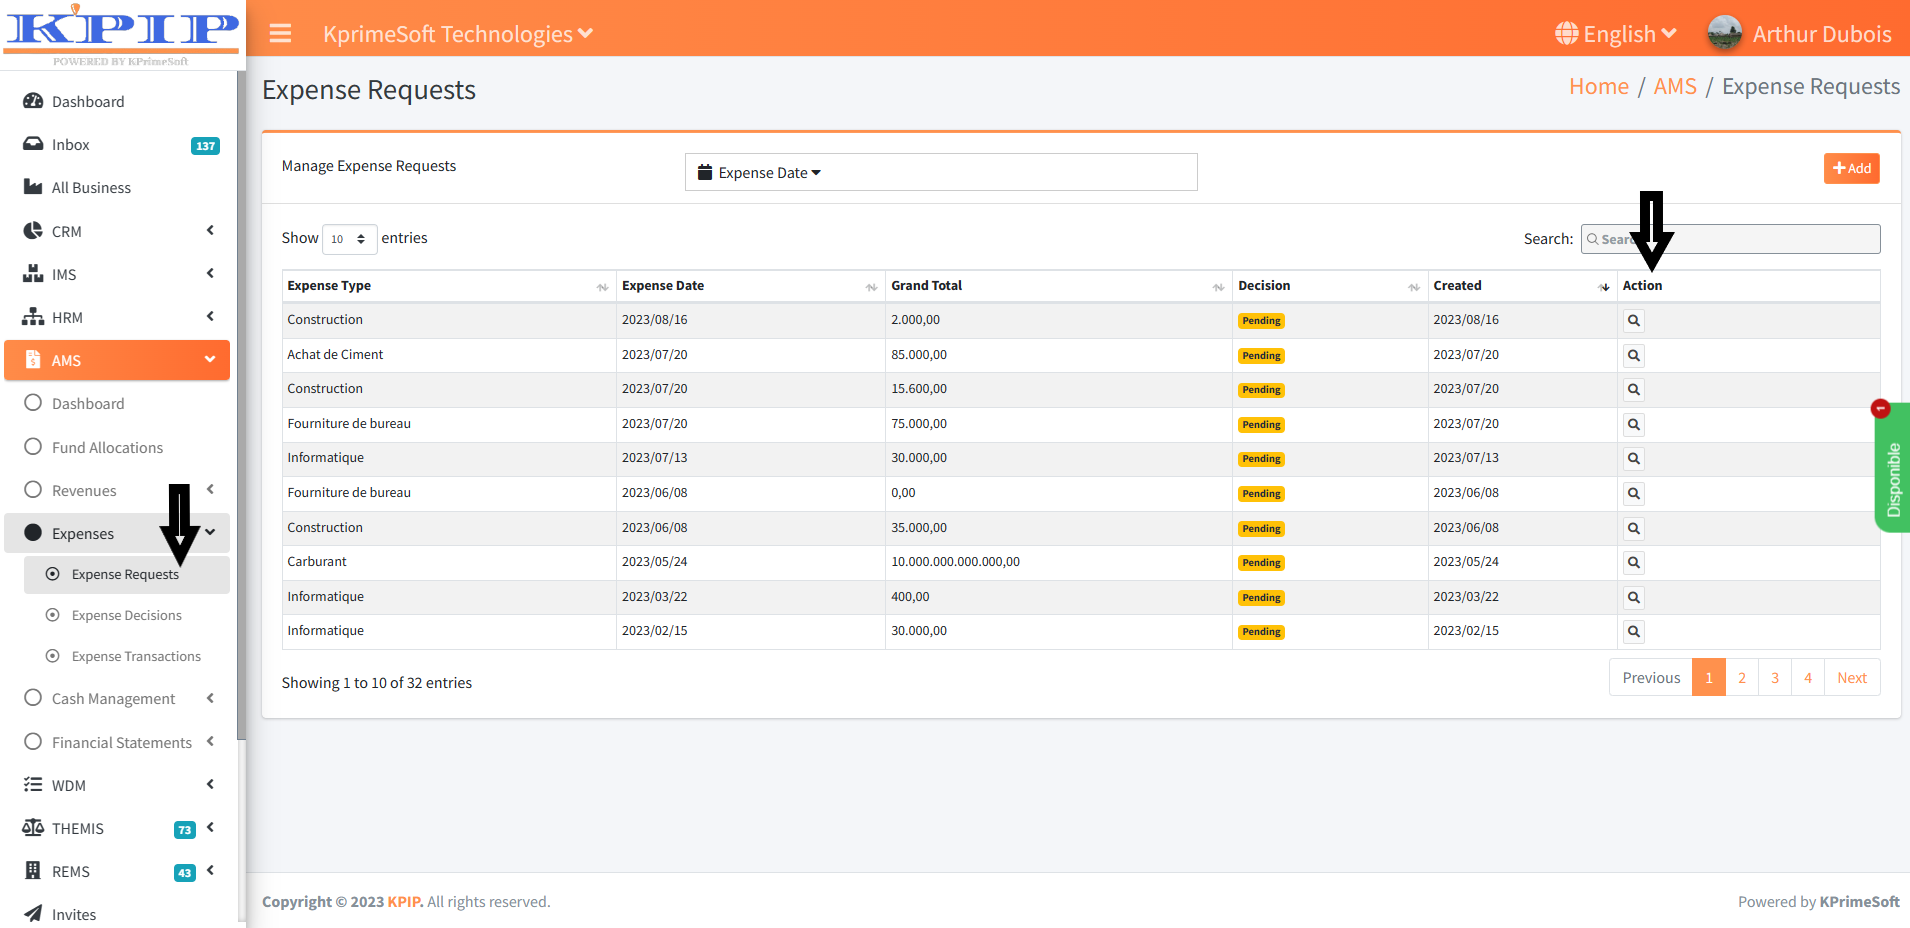
The "Show Entries" option enables you to specify the number of expense requests you wish to display per page.
The "Spend Date" option allows you to swiftly search for expense requests recorded within a specific time range.
The "Search" option permits you to look for expenses in AMS by entering your desired text. To do this, click inside the box and begin typing the text. You will be presented with selectable options, from which you can choose one. All the results associated with the entered text will be displayed.
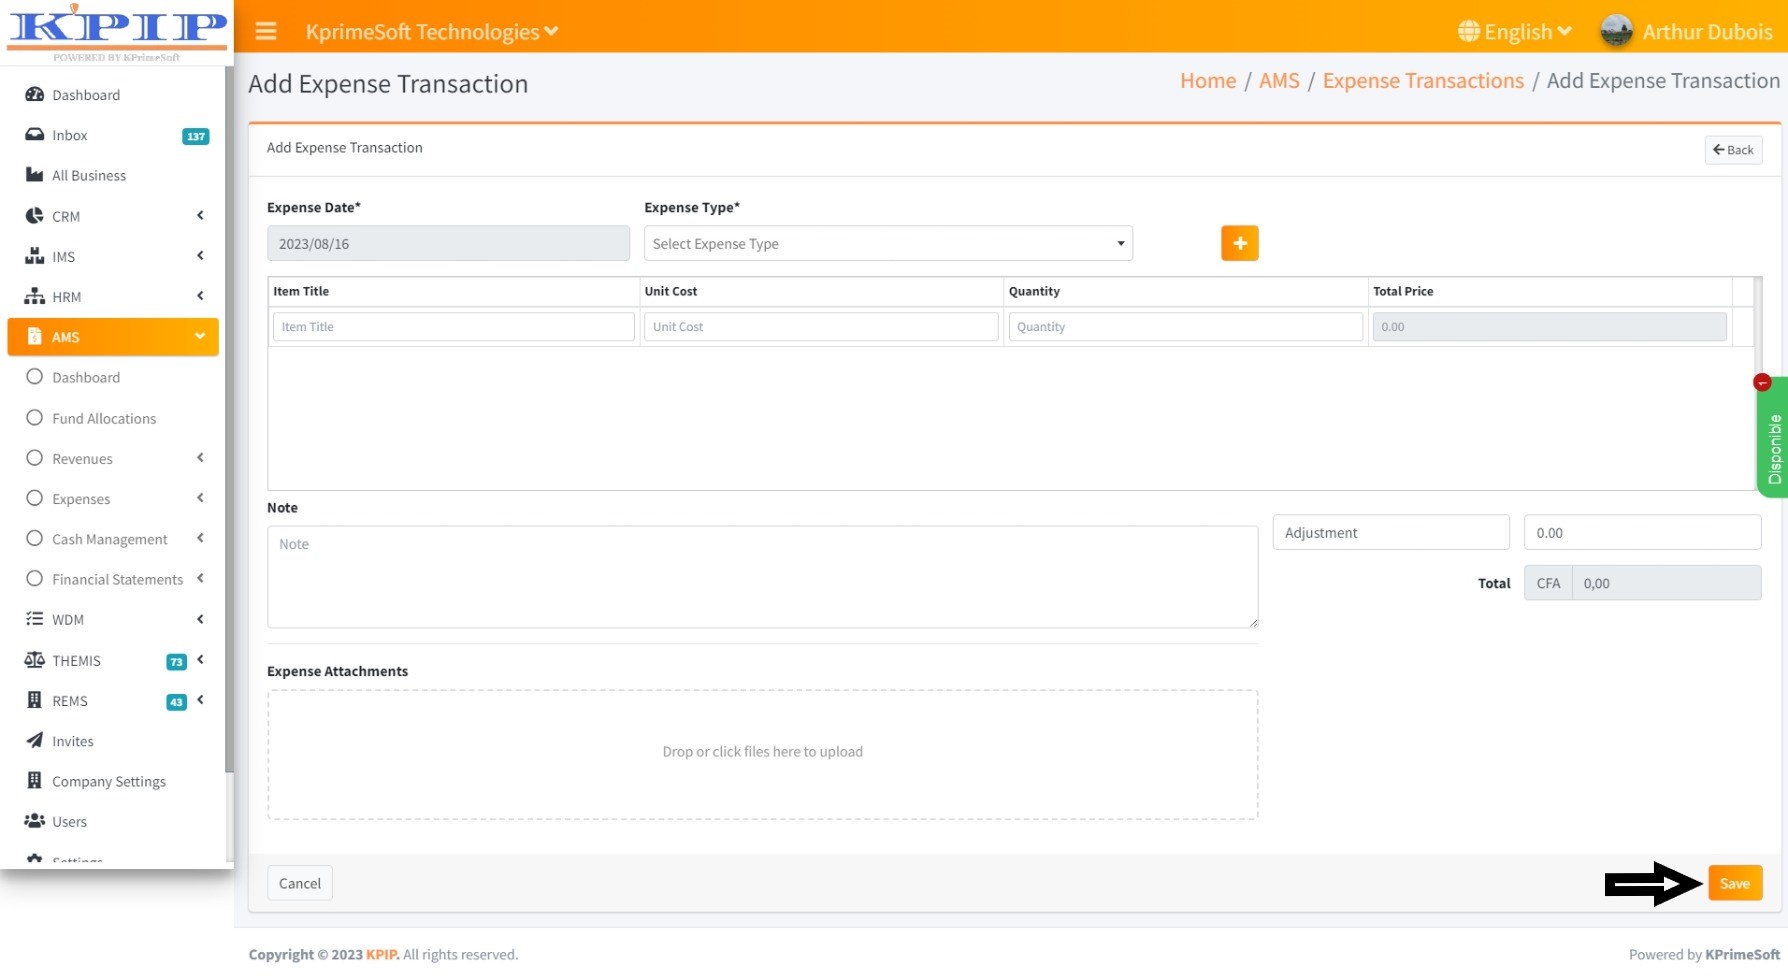
To add an expense request, click the "Add" button. On the subsequent page, complete the form and then click "Save" to save the information.

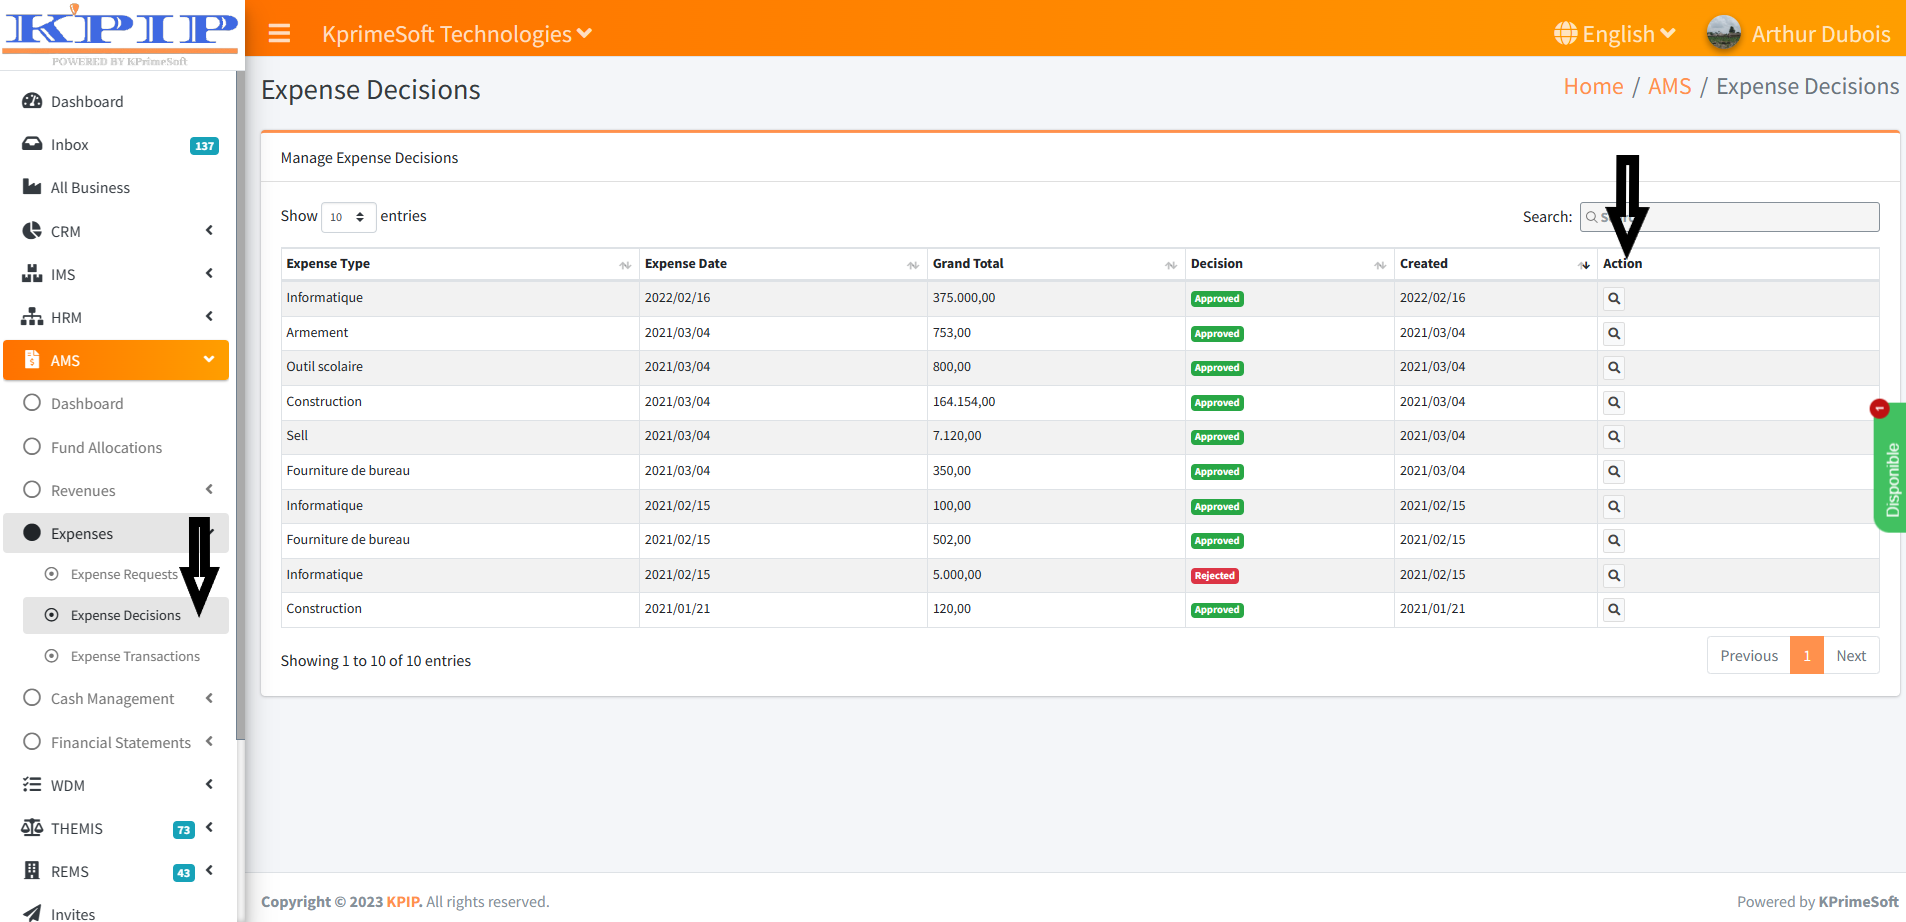
2. EXPENSES DECISIONS
This functionality empowers the manager to make decisions regarding expense requests.
Upon selecting the "Expense Decisions" feature, a table will promptly emerge on a new page, displaying all the submitted expense requests. Within the “Decision” section, you can easily determine whether an expense request is pending, approved, or rejected by the manager. Under the “Action” segment, you are provided with the option to take action (approve or reject) on the expenditure requests. This can be achieved by clicking the designated “Decision” button.
The “Show Entries” function permits you to specify the desired number of expense requests to be displayed per page.
Utilizing the "Search" option, you can seamlessly explore spending decisions within the AMS system by entering your desired keyword or phrase. Simply click within the search box, commence typing, and a list of selectable options will appear. All search results related to the input text will be promptly presented for your convenience.
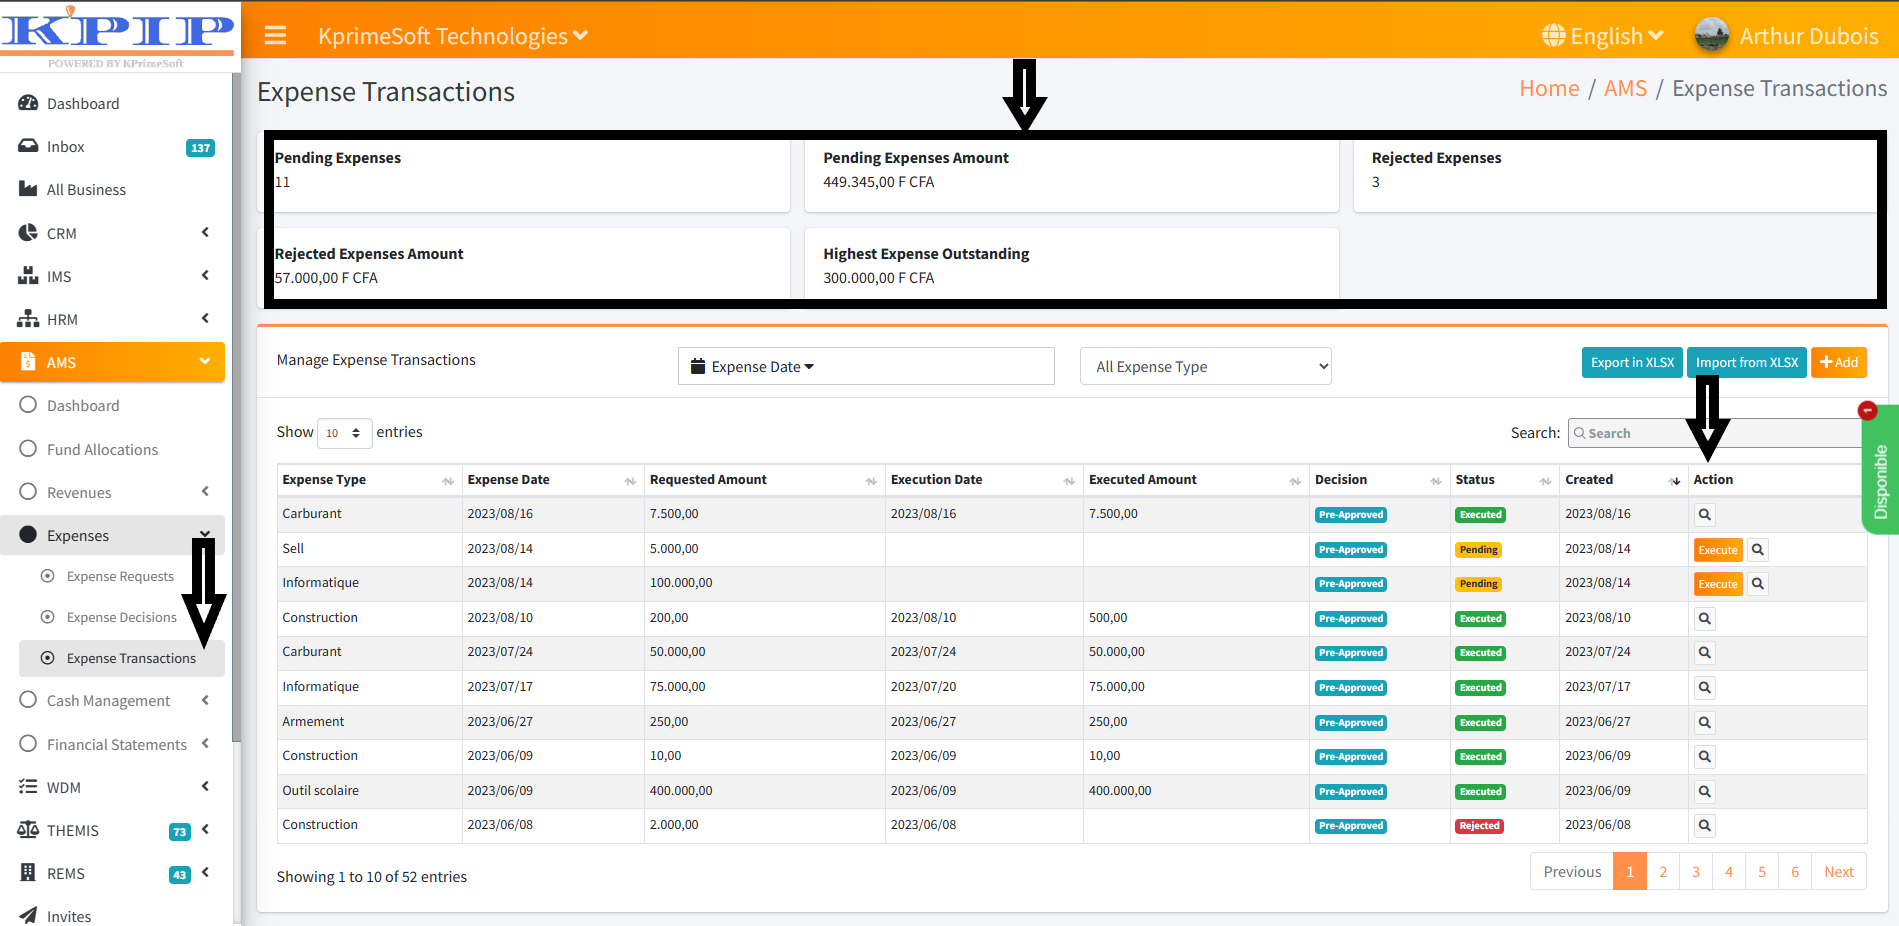
3. EXPENSES TRANSACTIONS
This feature enables the manager to access the historical records of all expenses and make decisions regarding expenses submitted from both the human resources and accounting departments.
The option labeled "All expense types" permits you to efficiently search through all submitted expense requests or sort expenses based on their respective types. The statistics and automatic filtering system are positioned above the data table. This setup provides a precise overview of the statistics and facilitates swift filtering of the data table. Simply click within the designated box and choose the desired expense types you wish to view.
V - CASH MANAGEMENT
1. BANK ACCOUNTS
This feature enables you to manage the company's registered bank accounts.
Upon selecting the "Bank accounts" feature, a table will be displayed on a new page, listing all the bank accounts that have been previously registered. Within the “Action” section, you have the option to view the details of a bank account, make edits, or initiate its deletion.

To add a bank account, click on the “Add” button. On the new page that appears, fill out the form, and then click on the “Save” button to save your information.

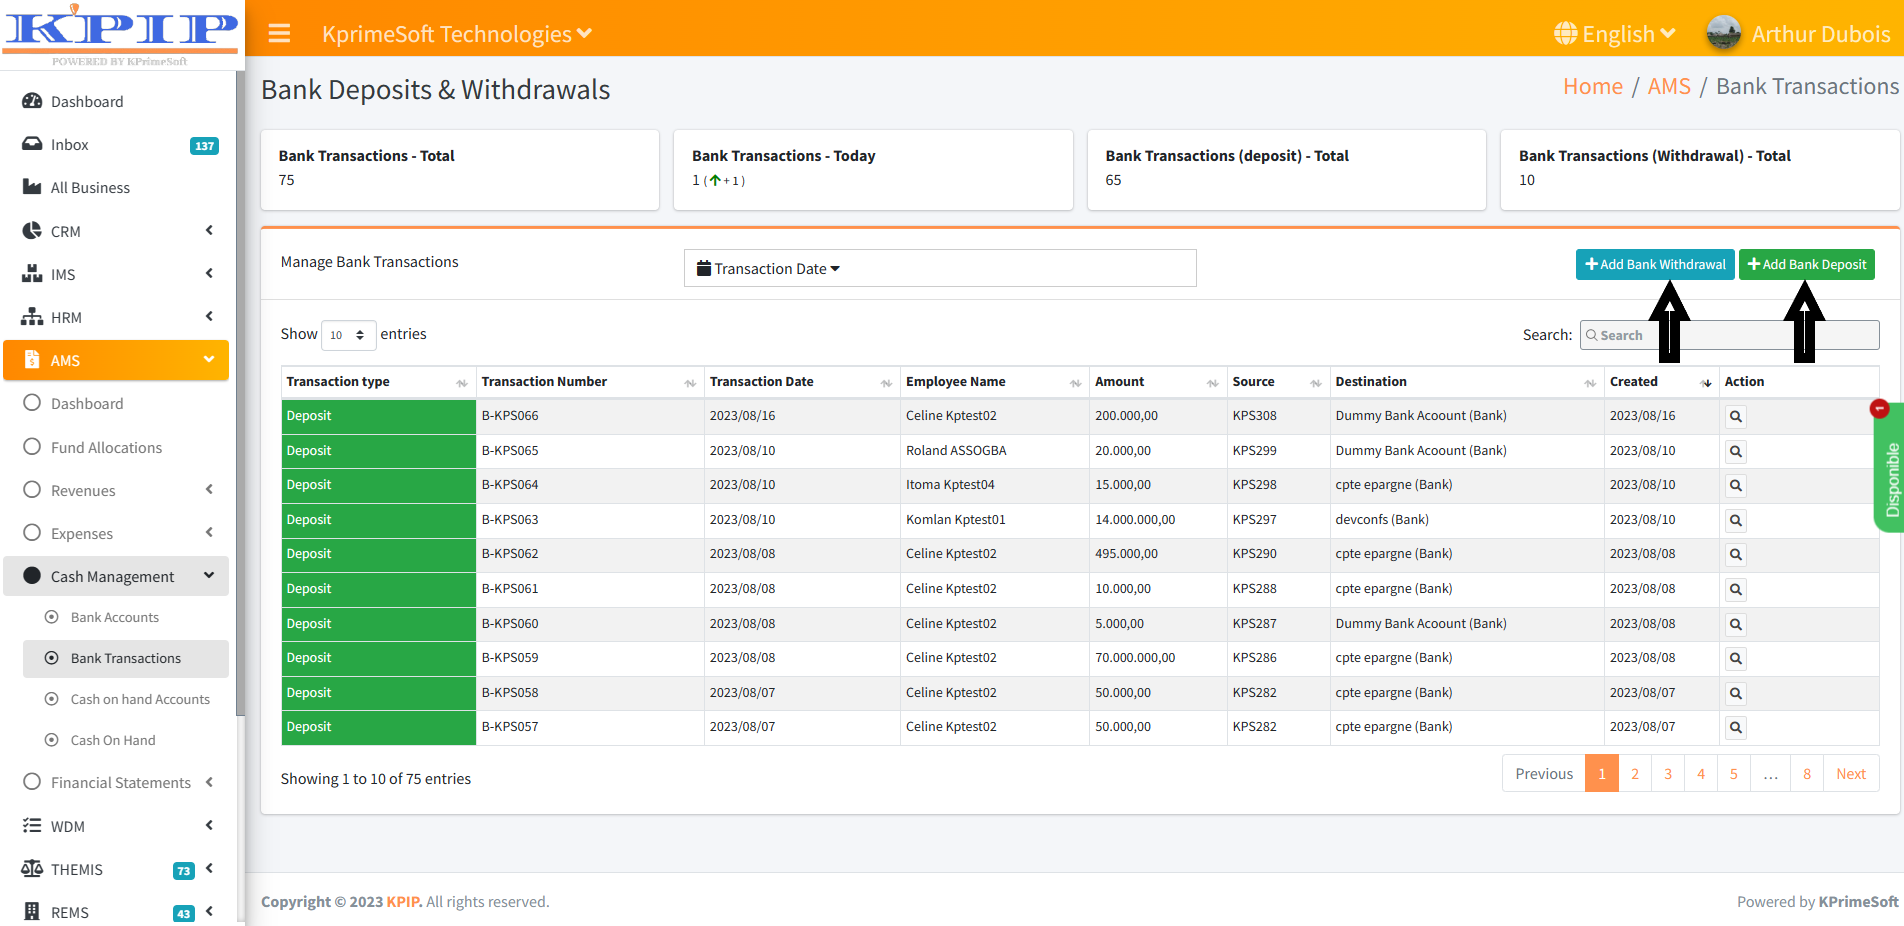
2. BANK TRANSACTIONS
This feature enables the recording of both bank deposits and withdrawals made by the company into/from its bank account.
Upon selecting the "Bank Transactions" feature, a table will be displayed on a new page, showcasing all executed bank transactions. Positioned above this data table, you'll find the statistics and an automated filtering system. This provides precise statistical insights and facilitates swift data table filtering. Within the “Action” section, you have the option to review, edit, or delete a bank transaction's details.
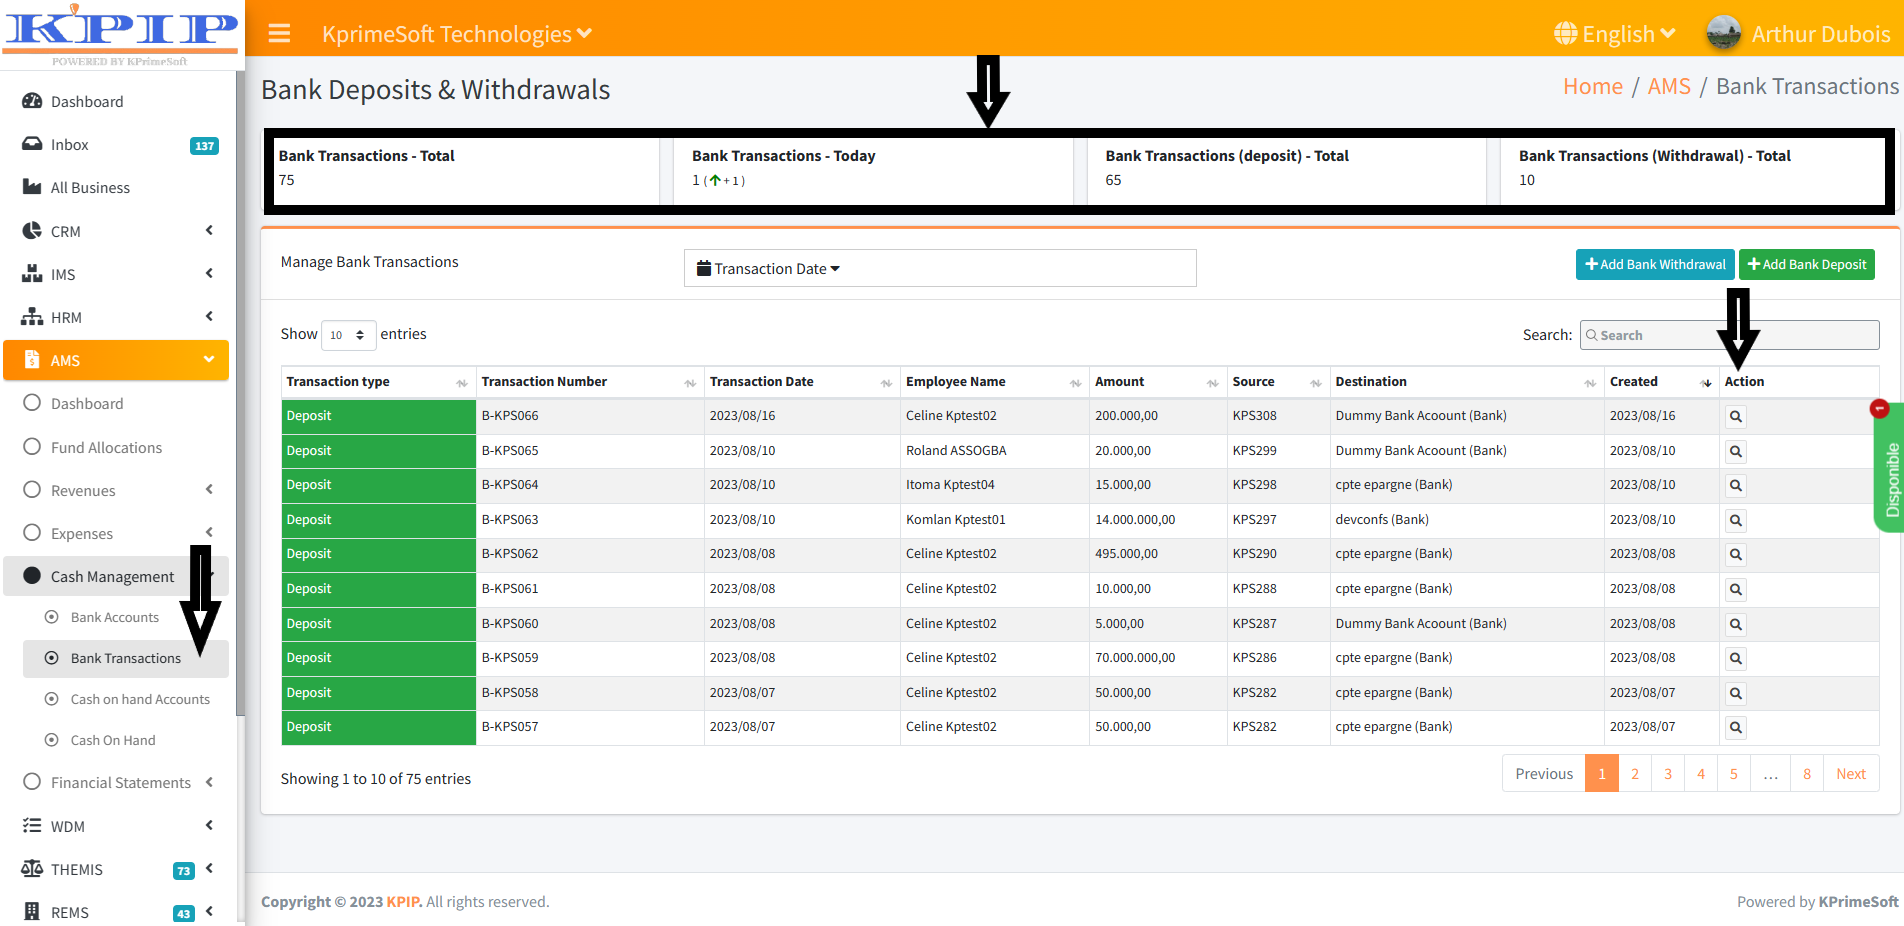
The "Show Entries" option enables you to specify the number of bank transactions you wish to display per page.
The "Transaction Date" option allows you to swiftly search for bank transactions recorded within a designated time range.
The "Search" option enables you to look up a bank transaction in AMS by entering your desired text. To do this, click inside the box and begin typing the text. You will be presented with selectable options, from which you can choose one. All results associated with the entered text will then be displayed.
For adding a withdrawal or a bank deposit, click either the "Add Bank Withdrawal" button or the "Add Bank Deposit" button. Upon reaching the ensuing page, complete the form and then click the "Save" button to retain your changes.
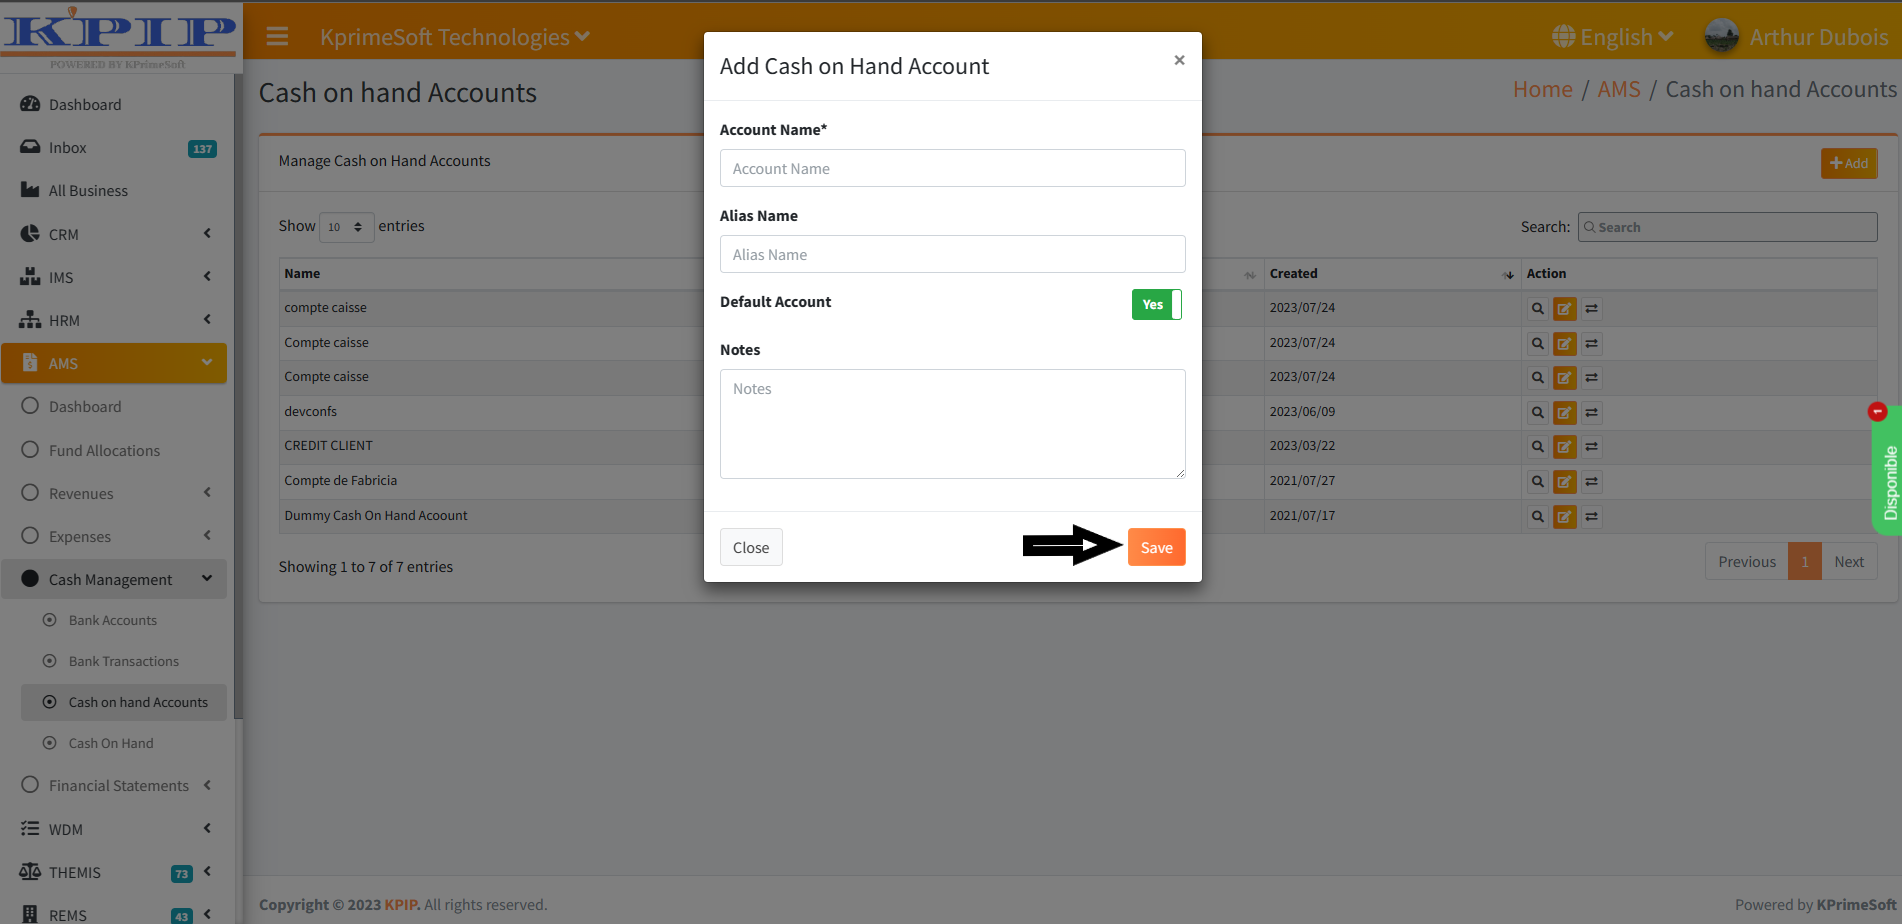
3. CASH ON HAND ACCOUNTS
This feature enables you to track and manage the cash accounts held by the company.
Upon selecting the "Cash On Hand Accounts" feature, a table will be displayed on a new page, listing all the previously registered cash accounts. In the "Action" section, you will have the options to view the details of a cash account, make edits to it, or remove it from the records.
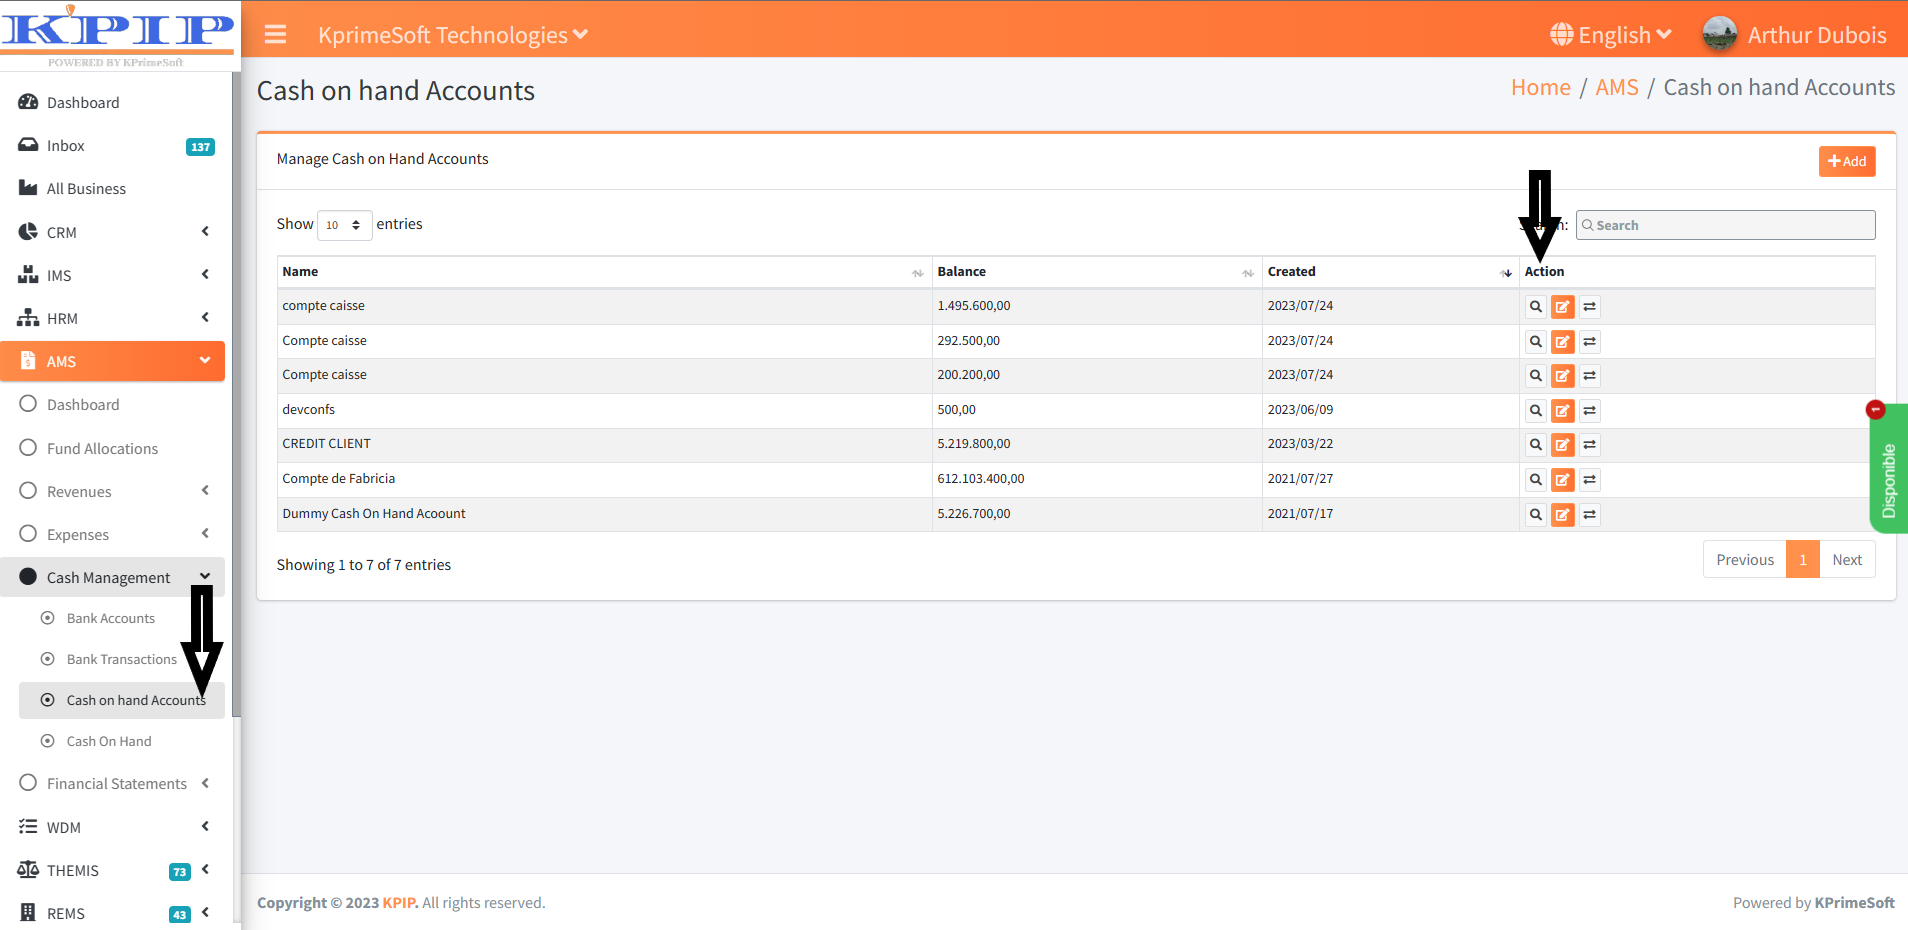
To add a cash account, click the "Add" button. On the subsequent page, complete the provided form, and then press the "Save" button to store the information.
4. CASH ON HAND
This feature enables you to log cash deposits and withdrawals initiated by an employee into the company's cash on hand account.
Upon selecting the "Cash on Hand" function, a table will be displayed on a new page, showcasing all the executed cash transactions. Within the "Action" section, you have the option to access the specifics of a cash transaction, make edits if necessary, or remove it entirely.
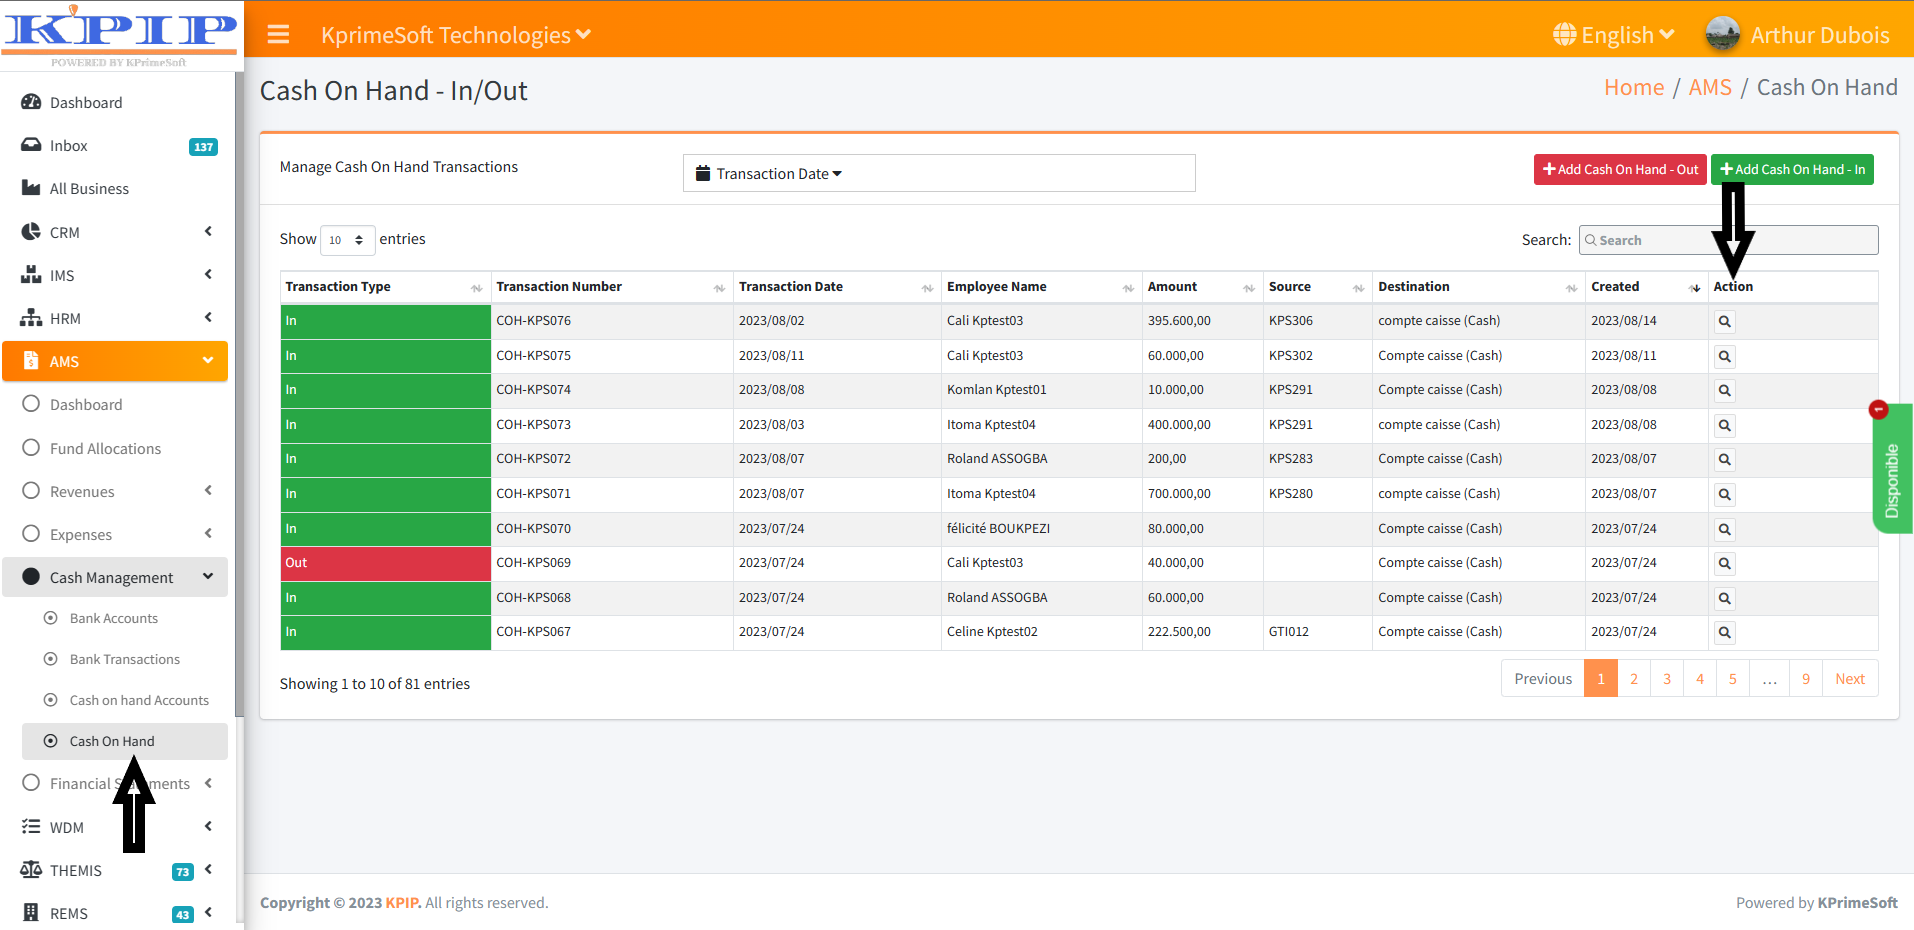
The "Show Entries" option enables you to specify the desired number of cash register transactions you'd like to appear on each page.
The "Transaction Date" option allows you to swiftly search for cash register transactions that have been recorded within a specific time range.
Utilize the "Search" option to find a cash transaction within the AMS system by inputting your desired text. Click within the designated box and begin typing the text. A list of options will be presented for you to choose from. All search results related to the entered text will be displayed.
For adding a withdrawal or cash deposit, select either the "Add Cash On Hand-Out" or "Add Cash On Hand-In" button. This action will lead you to a new page where you can complete the provided form. Upon completion, click the "Save" button to store the information.

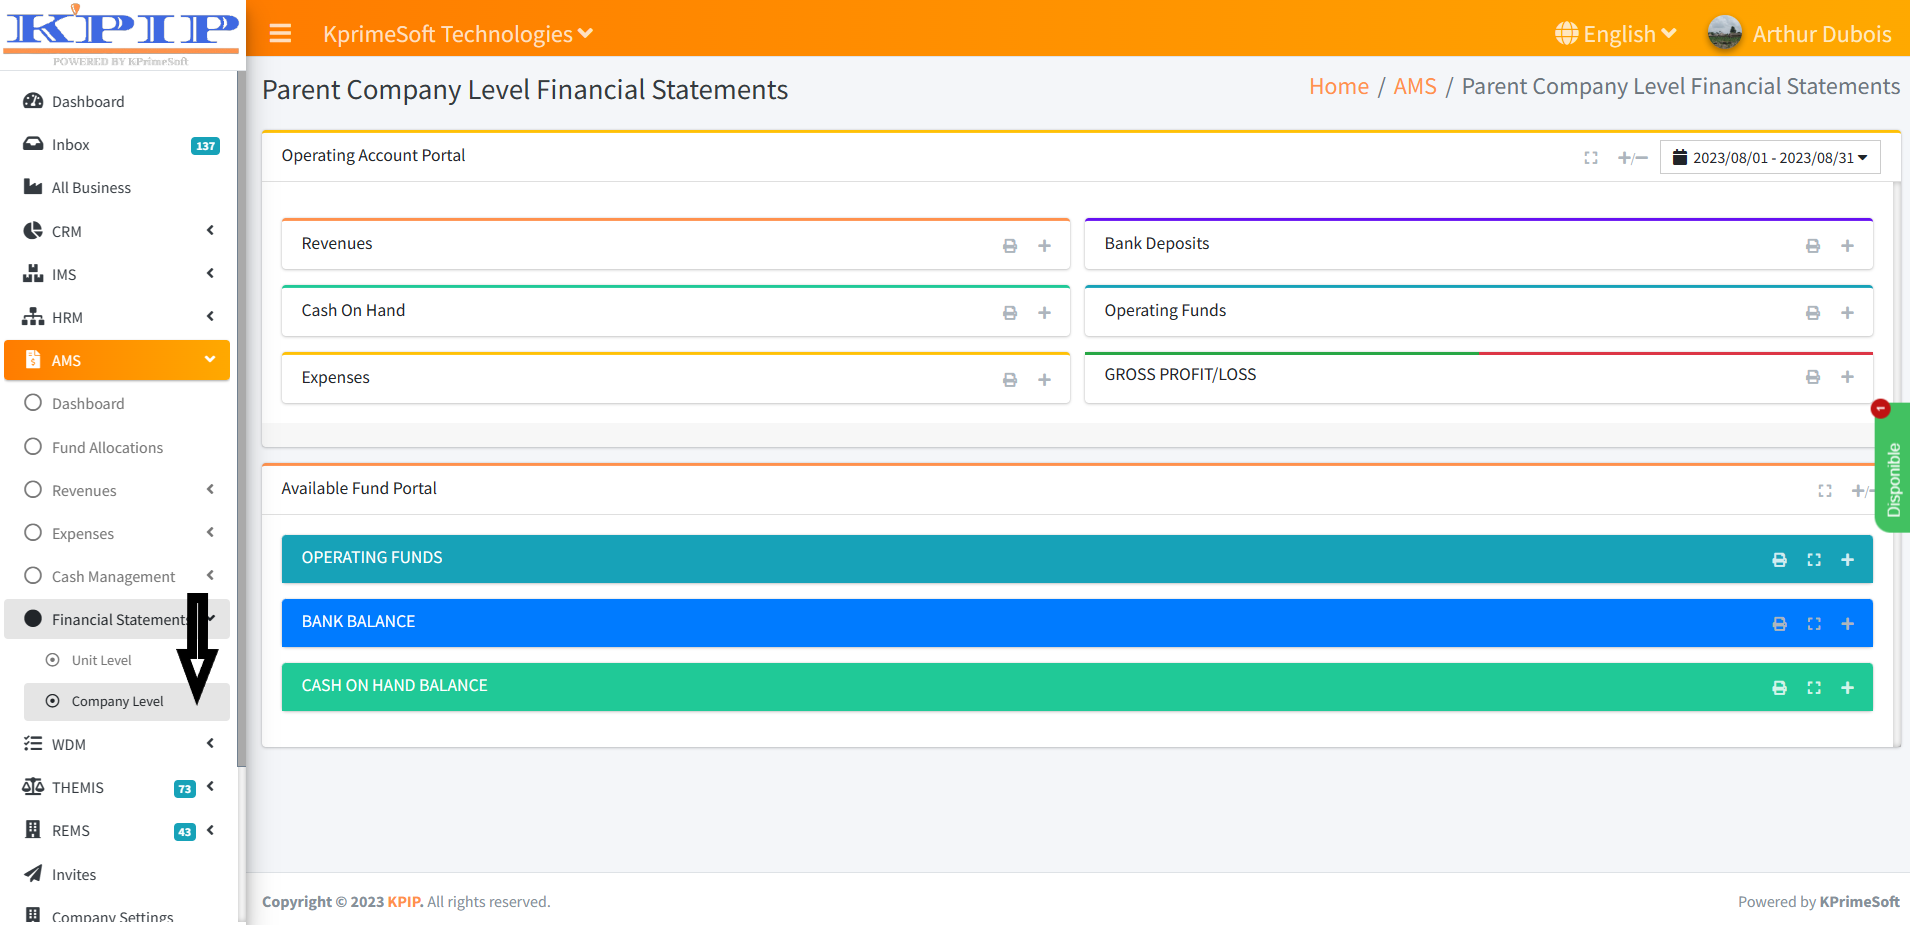
VI - FINANCIAL STATEMENTS
This feature enables you to view the financial status of the company. Upon clicking the "Financial Statements" option, two new features will emerge: unit level and company level.
Once you select the "Unit Level" feature, the financial statement for the current month pertaining to the specific sub-unit you are engaged with will be displayed. Within the date box, you have the flexibility to designate a particular time frame and examine the corresponding financial statement for that period.

When you click on the "Company Level" feature, you will be able to access the financial statement for the entire company for the current month. In the date box, you have the option to select and view the financial statements for any desired time interval. The "+" tab enables you to explore the financial statement details at both the parent company level and for all other units within the company.